
Carbon Black App Control
Agent Installation Guide
18 July 2024
VMware Carbon Black App Control services
You can find the most up-to-date technical documentation on the VMware by Broadcom website at:
https://docs.vmware.com/
VMware by Broadcom
3401 Hillview Ave.
Palo Alto, CA 94304
www.vmware.com
Copyright
©
2004-2024 Broadcom. All Rights Reserved. The term “Broadcom” refers to Broadcom Inc.
and/or its subsidiaries. For more information, go to https://www.broadcom.com. All trademarks, trade
names, service marks, and logos referenced herein belong to their respective companies.
Carbon Black App Control Agent Installation Guide
VMware by Broadcom 2
Contents
Preface 6
1 Preparing for Agent Installation or Update 7
Endpoint Configuration Overview 7
Pre-installation Activities 7
Installation and Initialization 8
Permissions for Endpoint Management 9
Assigning Endpoints to a Policy 10
Assigning Policy by Active Directory Mapping 11
AD Policy Mapping Summary 12
Enable the AD Mapping Interface 12
Creating AD Mapping Rules 13
Create an AD Policy Mapping Rule 15
Mapping Rule Ranking 19
AD Object Browser Options 19
Endpoint Registration and AD Mapping 21
Clearing the Server AD Cache 21
Viewing AD Computer Details in the Console 21
Uploading Agent Installers and Rules to the Server 22
Upload Agent Installer Packages to Server 23
View Current Agent Versions and Package Generation Status 24
Downloading Agent Installers 25
Download an Agent Installer 26
Verify the Windows Agent Digital Signatures 27
macOS Agent Installer Integrity and Signature Verification 28
2 About Installing Agents on Endpoints 33
3
Installing Windows Agents on Endpoints 35
Considerations When Installing an Agent using Group Policy 36
Install Windows Agents on Endpoints 36
Command Line Installations of Windows Agents 38
Conditions Requiring Reboot after Installation 40
4 Installing Linux Agents on Endpoints 42
Install Linux Agents on Endpoints 43
Enable Secure Boot for Linux Agents 45
VMware by Broadcom
3
5 Installing macOS Agents on Endpoints 49
Install macOS Agents on Endpoints 49
Installing or Upgrading the macOS Agent on a Computer Running Big Sur or Later Operating
System 51
Manually Install the macOS Agent on Big Sur or Later 52
Deploying macOS App Control Agents Using Jamf Pro (Big Sur+) 58
Create a Configuration Profile in Jamf 58
System Extensions Approval using Jamf 62
Create a Package Using Jamf Composer 63
Upload macOS agent DMG to Jamf Pro 64
Deploy Package using a Jamf Pro Software Distribution Policy 65
Create and Assign Smart Computer Groups 67
Kext and System Extension Support 69
Allowing the Agent Kernel Extension (Mojave or Later) 70
Allow the Agent Kernel Extension During Agent Installation or Upgrade or Kernel
Extension Supporting macOS Versions 70
Allow the Agent Kernel Extension After Agent Installation or Upgrade on Kernel
Extension Supporting macOS Versions 71
Enable Full Disk Access (FDA) with MDM 71
6 Verify the Agent Installation 73
7 Post-installation Activities 74
8 Upgrading Agents on Endpoints 76
Feature Limitations for Non-Upgraded Agents 77
Upgrade Issue with Windows XP and Server 2003 77
Enabling Automatic Agent Upgrades 78
Upgrading Agents from the Console 79
Upgrade Agents from the Console 79
Automating macOS Agent Upgrades Using an MDM Tool 80
Upgrading macOS App Control Agents Using Jamf Pro (Big Sur+) 81
Upgrade the macOS App Control Agent Using Jamf Pro (Big Sur+) 81
Manually Upgrading Agents 83
Manually Upgrading Windows Agents 84
Manually Upgrade Windows Agents 84
Manually Upgrade Linux Agents 85
Manually Upgrade macOS Agents 86
Agent Upgrade Status 87
9 Uninstalling Agents on Endpoints 89
Uninstall the Windows Agent from an Endpoint 89
Carbon Black App Control Agent Installation Guide
VMware by Broadcom 4

Preface
This guide provides information for system or network administrators who install, update, and
uninstall Carbon Black App Control agent software on Windows, Linux, and macOS endpoints.
Important The Carbon Black App Control agent installation process is non-interactive; it requires
no user input. As soon as installation is completed, the Carbon Black App Control agent begins
working – no additional configuration is needed, and in most cases a restart is unnecessary.
Intended Audience
This documentation provides agent installation, update, and uninstall instructions for
administrators, incident responders, and others who will operate
Carbon Black App Control.
Staff who manage Carbon Black App Control activities should be familiar with operating systems,
web applications, installed software, desktop infrastructure (especially in-house procedures for
software roll-outs, patch management, and anti-virus software maintenance), and the effects of
unwanted software.
Note This installation guide is written in a way that is not specific to a particular agent version.
However, images may not match your version precisely. When there is a difference that is
significant in the content, version-specific information, such as specific steps, are added.
Document History
For a list of changes made to this guide, see Chapter 10 Document History.
VMware by Broadcom
6
Preparing for Agent Installation or
Update
1
This section describes the steps necessary to install Carbon Black App Control agents on
endpoints. It also describes how to upgrade agents.
Tasks include adding installation packages for agents and rules files to the server, downloading
the Carbon Black App Control agent from a server to an endpoint, and installing the agent on an
endpoint.
Read the following topics next:
n Endpoint Configuration Overview
n Assigning Endpoints to a Policy
n Assigning Policy by Active Directory Mapping
n Uploading Agent Installers and Rules to the Server
n Downloading Agent Installers
Endpoint Configuration Overview
When you install and run the Carbon Black App Control agent on an endpoint, the endpoint
become protected by rules defined on an Carbon Black App Control server. After the agent is
installed, an initialization process begins, and connected agents become visible to their Carbon
Black App Control server, delivering information about the endpoint and its files to the server
Pre-installation Activities
This topic describes key computer configuration decisions you must make before installing
Carbon Black App Control agents on endpoints.
n CLI Management configuration options allow you to designate a user or group, or a
password usable by anyone, to perform certain agent management activities in conjunction
with Carbon Black Support. Especially if you have systems that will be permanently offline,
it is best to choose one of these options before creating policies and distributing agent
installation packages. See "Advanced Configuration Options" in the
Carbon Black App Control
User Guide
for more details.
VMware by Broadcom
7
n Rules file and agent installer packages must be uploaded to the server from the Downloads
page of the Broadcom Customer Portal. Beginning with Carbon Black App Control Server
v8.1.4, rules and agent installers have been separated from the server installation to allow for
greater flexibility in updates.
n For a new Carbon Black App Control server, you must upload the rules file and agent
package installers to the server before agents can be downloaded to endpoints.
n For a server upgraded from a previous version, your previous rules and agent installers
remain in place, but there might be new rule and agent updates.
n Policies determine the groups of security settings available to endpoints — every agent
belongs to a policy. See "Creating and Configuring Policies" in the
Carbon Black App Control
User Guide
if you have not yet created policies.
n Script Rules are best created and enabled before you deploy agents. This ensures that
all files matching those rules are in the inventory and can be approved or banned if you
choose. Script rules created or enabled after an agent is deployed require that endpoints
be rescanned before the files they identify are inventoried. See "Script Rules" in the
Carbon
Black App Control User Guide
for more details.
n Review the expired certificate validation setting, especially if you will be running endpoints
offline. If you intend to allow file approval by certificates that have expired, make this choice
before you download and install the agents on permanently offline endpoints — otherwise,
they cannot use expired certificates. See "Approval with Expired Certificates" in the
Carbon
Black App Control User Guide
for more details.
n Initial Policy assignment to an endpoint can be determined by Active Directory data, as
described in "Assigning Policy by Active Directory Mapping" in the
Carbon Black App Control
User Guide
— or by the agent installer, as described in Downloading Agent Installers.
Although you can change this decision later, determining how you want policies assigned
before installing agents is recommended.
n Preparing a reference endpoint for a “snapshot” of files can give you a baseline for the files
in your environment if you plan to closely monitor changes in your file inventory. Ideally, this
is a clean computer onto which you install only the applications that you would like to run on
some or all of your systems. After the endpoint is prepared, you can install the agent and,
after initialization is complete, use the Snapshot process as described in "Monitoring Change:
Baseline Drift Reports" in the
Carbon Black App Control User Guide
.
Installation and Initialization
For each security policy you create, an agent installer is created for each supported platform
(Windows, macOS, or Linux) for which an initial installer package has been uploaded to the
server. Each agent installer includes the policy assigned to the computer and the Carbon Black
App Control server address
If you do not use AD-based policy assignment, you choose the agent installer for each endpoint
based on the endpoint’s platform and the policy that you want to control that endpoint.
Carbon Black App Control Agent Installation Guide
VMware by Broadcom 8

Setting up your server so that it can create installers is described in Uploading Agent Installers
and Rules to the Server. Installation of agents on endpoints is described in:
n Downloading Agent Installers
n Chapter 2 About Installing Agents on Endpoints
n Chapter 3 Installing Windows Agents on Endpoints
n Chapter 4 Installing Linux Agents on Endpoints
n Chapter 5 Installing macOS Agents on Endpoints
Tip It is a best practice to install agent software into a Disabled Mode policy. Such a policy
is configured to be in Disabled Enforcement mode. In such a scenario, the agent only initializes
when moved into any policy that is not configured for Disabled Enforcement.
File initialization begins in either of the following cases:
n As soon as the agent software is installed into a visibility-mode or control-mode policy.
n If the agent is moved from a disabled-mode policy to a visibility-mode or control-mode policy.
The agent takes an inventory of all “interesting files” (executables and defined scripts) on the
client computer’s fixed drives (but not removable drives) and creates a hash of each file. When
an endpoint first connects to the server, its agent sends these hashes to the Carbon Black App
Control server to update the server’s file inventory.
Note Virtual machines cloned from template computers can be configured to include or omit
their initial (cloned) files in their inventory. See "Configuring Clone Inventory" in the
Carbon Black
App Control User Guide
for more details.
Carbon Black App Control assigns files both a local and a global file state. Files that exist on
an endpoint at initialization receive a local state of Approved unless they have previously been
identified and globally banned or banned by policy on the Carbon Black App Control server.
Unless pre-banned or pre-approved by an Carbon Black App Control rule, files that the Carbon
Black App Control server has never seen before will get the global state of Unapproved and
be added to the catalog. If a file was first seen on this agent after initialization, it will also get
the local state of Unapproved on the agent. For more information on file state, see "File State,
Approving and Banning" in the
Carbon Black App Control User Guide
.
During initialization, the computer is protected by whatever security policy is assigned to it, and
file activities are allowed or blocked according to that policy.
Permissions for Endpoint Management
Access to Carbon Black App Control endpoint management features depends upon the Login
Account Role Permissions for the user who is attempting access.
Relevant permissions are:
n View computers – Ability to view endpoint pages
Carbon Black App Control Agent Installation Guide
VMware by Broadcom 9
n Temporary assign computers – Ability to generate temporary policy override codes
n Manage computers – Ability to manually assign computer (endpoint) to policies and change
Enforcement Level
n Change advanced options – Ability to change advanced options such as collection
diagnostics and re-synchronizing
n Manage system configuration – Ability to upload new agent installer and rule packages
The built-in user roles have the following endpoint management permissions:
n Administrator and PowerUser accounts (including Unified Management versions) with default
permissions have full access to these features.
n Read-Only users with default permissions can view the details of endpoints running agents
but cannot add, delete, or change their configuration.
n The access level of users in custom login account roles depends on the role’s permissions
in the Computers asset rows on the Add Edit Role page. Note that some features described
here require additional permissions.
See "User Role Permissions" in the
Carbon Black App Control User Guide
for full details on
viewing and changing login account role permissions.
In addition to standard computer management features, some or all users can be allowed
to access agent management commands that can be used in special situations, usually in
consultation with Carbon Black Support. See "Configuring Agent Management Privileges" in the
Carbon Black App Control User Guide
for more details.
Assigning Endpoints to a Policy
Every endpoint running a Carbon Black App Control agent is assigned a security policy. There are
three standard ways an endpoint can be assigned its policy.
n By Agent installer – Every policy you create generates a policy-specific Carbon Black App
Control agent installer for each supported platform, so when you install the agent on an
endpoint, it is assigned a policy. When the agent contacts the Carbon Black App Control
server after agent installation, the endpoint is added to table of computers (endpoints) in the
console. If you have not set up AD-based policy assignment, the agent remains in the policy
embedded in its installer unless you manually reassign it.
You do not have to (nor should you) reinstall a Carbon Black App Control agent to make
a policy change for an endpoint. You normally need to install the agent only one time per
endpoint.
n Automatically, by Active Directory (AD) group mapping – You can set up the Carbon Black
App Control server to run a script that assigns new and, if configured, existing endpoints to
security policies according to the AD group information of the endpoint (or the user logged
Carbon Black App Control Agent Installation Guide
VMware by Broadcom 10

in to it). An endpoint's initial policy is defined by the agent installer. If that initial policy
is configured to allow automatic policy assignment, this AD-based policy assignment takes
precedence. Policy assignment by AD mapping is described in Assigning Policy by Active
Directory Mapping.
n Manually – You can move any endpoint to a policy other than the one assigned by the
installer or the AD-mapping facility. This might be useful if you discover that a particular
endpoint used the wrong installer, or that its security policy should differ from other
endpoints in the AD group that was used to map its policy. Manual assignment might also
be used for a temporary situation that requires more or less restriction for an endpoint or
its user. If you manually change an endpoint's policy, you can later restore its original policy
(or to automatic assignment). Manual policy assignment is described in "Moving Computers to
Another Policy" in the
Carbon Black App Control User Guide
.
You can move endpoints from manual to automatic policy assignment and vice versa.
Note In certain cases, policy can be changed for reasons other than those listed above. For
example:
n If you delete the policy an agent belongs to while the endpoint is offline, the agent moves
to the Default policy group. See "Restoring Computers from the Default Policy" in the
Carbon
Black App Control User Guide
for more details.
n There is an Event Rule action that can move endpoints to a different policy when a specified
event occurs. See "Creating and Editing Event Rules" in the
Carbon Black App Control User
Guide
for more details.
If you are not using AD-based policy assignment, you can skip the AD-mapping topics and go
directly to Downloading Agent Installers for instructions on choosing a policy-specific installer.
Assigning Policy by Active Directory Mapping
You can create rules that map each endpoint to a certain policy based on its Active Directory
(AD) data.
AD-based policy assignment happens when an agent first contacts the Carbon Black App Control
server, and is checked again each time the server and agent re-establish contact or the logged-
in user on the agent endpoint changes (see Endpoint Registration and AD Mapping for more
information on when mapping can change).
Carbon Black App Control Agent Installation Guide
VMware by Broadcom 11

AD Policy Mapping Summary
To make use of AD-based policy assignment, you must perform the following actions.
n Install the Carbon Black App Control server in an AD Domain – Install the Carbon Black App
Control server on an endpoint that is a member of an Active Directory domain. By default, the
Carbon Black App Control server must be in the same AD forest as the computers and users
you want to map. If you require cross-forest integration, contact your Carbon Black Support
representative.
n Enable the AD Mapping Interface – You enable the AD-based policy mapping interface in
the Active Directory LDAP integration panel on the General tab of the System Configuration
page.
n Create AD-mappable Target Policies – Create the security policies to which you want
endpoints assigned by AD Mapping, and make sure these policies allow automatic policy
assignment.
n Create Mappings – On the Mappings tab of the Policies page, create AD Policy Mapping rules
that use AD data to assign endpoints to different security policies
n Install or Move Agents to AD-mappable Policies – For new agent installations, make sure
that the policy for the agent installation packages allows automatic policy assignment. For
mapping to be successful, both the current policy of an agent and the policy to which will be
mapped must have automatic policy assignment enabled. For existing agents, if necessary,
you can change a policy from manual to automatic after installation or move the agent to an
AD-mappable policy.
Note The App Control Server will perform AD-mapping for any endpoint that is configured
through your Active Directory server, including non-Windows platforms.
Enable the AD Mapping Interface
Perform the following procedure to enable the AD Mapping interface.
Procedure
1 In the console menu, click the configuration (gear) icon and click System Configuration. The
System Configuration page displays.
Carbon Black App Control Agent Installation Guide
VMware by Broadcom 12
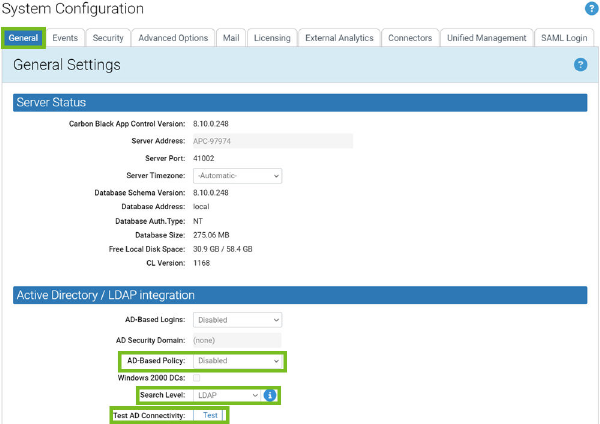
2 If the General Settings view is not already displayed, click the General tab. The second panel
on the General tab is Active Directory/LDAP integration.
3 In the Active Directory/LDAP Integration panel, click the Test button next to Test AD
Connectivity. If you see a Success message, continue to the next step. If you see an Error
message, your Carbon Black App Control server is unable to access AD. AD Mapping will not
work until you correct the problem.
4 If AD connectivity succeeds, click the Edit button at the bottom of the window.
5 In the AD-based Policy dropdown menu, click Enabled.
6 In the Search Level dropdown menu, select Global Catalog for the AD browser to search all
domains, or select LDAP for a restricted search.
7 To submit the changes, click the Update button and then click Yes on the confirmation dialog.
Creating AD Mapping Rules
After the AD-based Policy interface is enabled, a new tab, Mappings, is visible on the Policies
page. Clicking on this tab opens the Active Directory Policy Mappings page. This is where you
create rules to map computers with specified AD data to certain policies
Before you begin setting up mapping rules, make sure you have created all of the policies to
which you want computers mapped.
You can create mapping rules that test for matching AD data including organizational units,
domains, security groups, computer names, and user names. Keep the following in mind when
creating mapping rules:
n Although you can choose to match AD Security Group data for either users or computers,
computer-based rules are recommended. With multiple users on a computer, sometimes
simultaneously logged on, AD Mapping rules based on users could lead to unexpected
results.
Carbon Black App Control Agent Installation Guide
VMware by Broadcom 13

n Carbon Black App Control does not support policy mapping for AD object names that
contain double quotes. Object names with double quotes cannot be handled properly by
the directory object browser you use to create a mapping rule.
n Try to create as few rules as possible and test for groups rather than individual objects.
The following table shows the rule parameters you provide for a mapping rule.
Table 1-1. AD Mapping Rule Parameters
Parameter Description
Computer Object to Test The object that will be tested to see whether it matches
the rule. The choices are Computer, User, and User or
Computer.
Relationship The relationship being evaluated between the Directory
Object specified in the rule and the AD data from the
computer being assigned a policy. The choices are:
n is member of group
n is in OU or domain
n is
n is not in any domain
Directory Object The object in AD that the data from the tested object
must match. Clicking the right end of this field opens an
browser from which you can search for an object in your
AD environment.
The choices for the Directory object field change
depending upon which Relationship you choose. If you
choose “is not in any domain,” no Directory object is
necessary.
Policy to Apply The policy to apply to a computer if its tested object
matches the rule. The dropdown menu shows all available
policies.
Note For policies created before implementation
of Active Directory policy mapping, "Automatic policy
assignment" is off by default. If you implement AD policy
mapping and set up new mapping rules that apply to a
pre-existing policy, you will need to change the setting on
the policy itself for automatic mapping to take place. See
"Creating Policies" in the
Carbon Black App Control User
Guide
for more information about automatic assignment
choices.
The result of providing these parameters is a rule that can be read like a sentence. The following
is how you might set up one rule.
Carbon Black App Control Agent Installation Guide
VMware by Broadcom 14
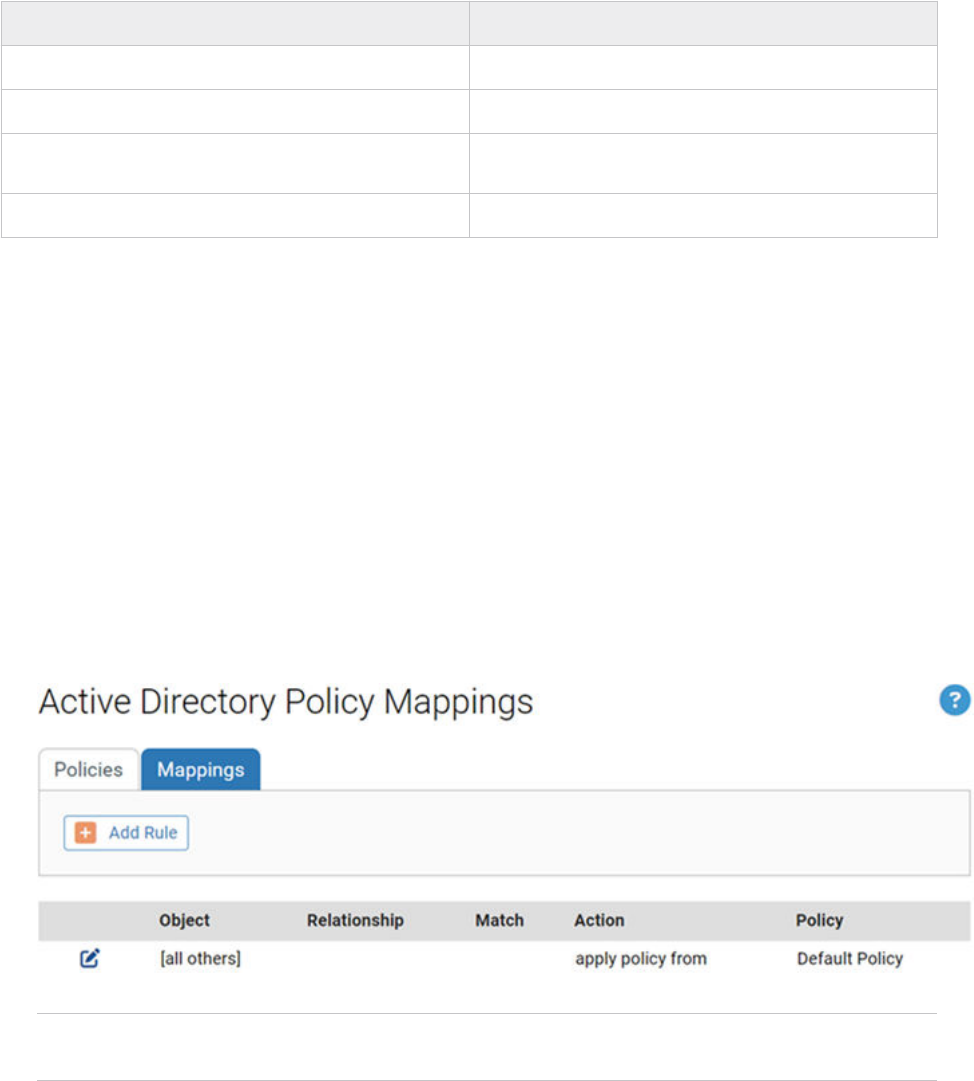
Table 1-2. Example AD Mapping Rule
Parameter Example (value in bold)
Computer Object to Test If a Computer…
Relationship … is in OU or domain …
Directory Object …matching OU =
Marketing,DC=hq,DC=xyzcorp,DC=local …
Policy to Apply … assign that computer to the Standard Protection policy.
Create an AD Policy Mapping Rule
The following procedure shows how to configure an AD mapping rule. Although most
parameters are reasonably straightforward, pay particular attention to the Directory Object
field, which requires use of a special AD browser.
Procedure
1 In the console menu, click Rules > Policies.
The Policies page opens and shows a list of all available policies.
2 Click the Mappings tab.
The Active Directory Policy Mappings page displays together with the Policy Mappings table,
initially showing only the default rule.
Note If no Mapping tab appears, the AD mapping interface has not been enabled. Go to the
General tab of the System Administration page and enable the feature.
Carbon Black App Control Agent Installation Guide
VMware by Broadcom 15

3 On the Active Directory Policy Mappings page, click Add Rule to display the Active Directory
Policy Mapping Rule panel in which you enter the rule parameters.
4 Select the Computer Object to Test (Computer, User, or Computer and User) from the
dropdown menu. In most cases, Computer is the best choice.
5 Select the Relationship between the data of the object tested and the Directory Object
specified in the rule.
The choice for this field changes the choices available in the other fields.
In this field, you can specify that objects must be in a OU or domain, a security group,
in no domain, or that they exactly match the directory object you choose (the “is” choice
on the Relationship menu). Generally, it is best to choose a relationship that maps multiple
computers to a policy rather than one that singles out an individual computer or user.
Carbon Black App Control Agent Installation Guide
VMware by Broadcom 16

6 Choose the Directory Object that the data from the tested computer must match.
a Click in the Directory Object field to open the AD browser.
The browser opens immediately below the Directory object field. The left panel is labeled
Search in, and shows a tree of your AD domains.
n To expand the AD tree in the left panel, click on the plus button next to the node to
expand.
n To collapse the view on the left, click the minus button next to the node to collapse.
b Click the object in the left pane that defines the scope of your search.
Example: If you have two domains, you might click one of them, such as
DC=hq,DC=xycorp,DC=Local.
Carbon Black App Control Agent Installation Guide
VMware by Broadcom 17
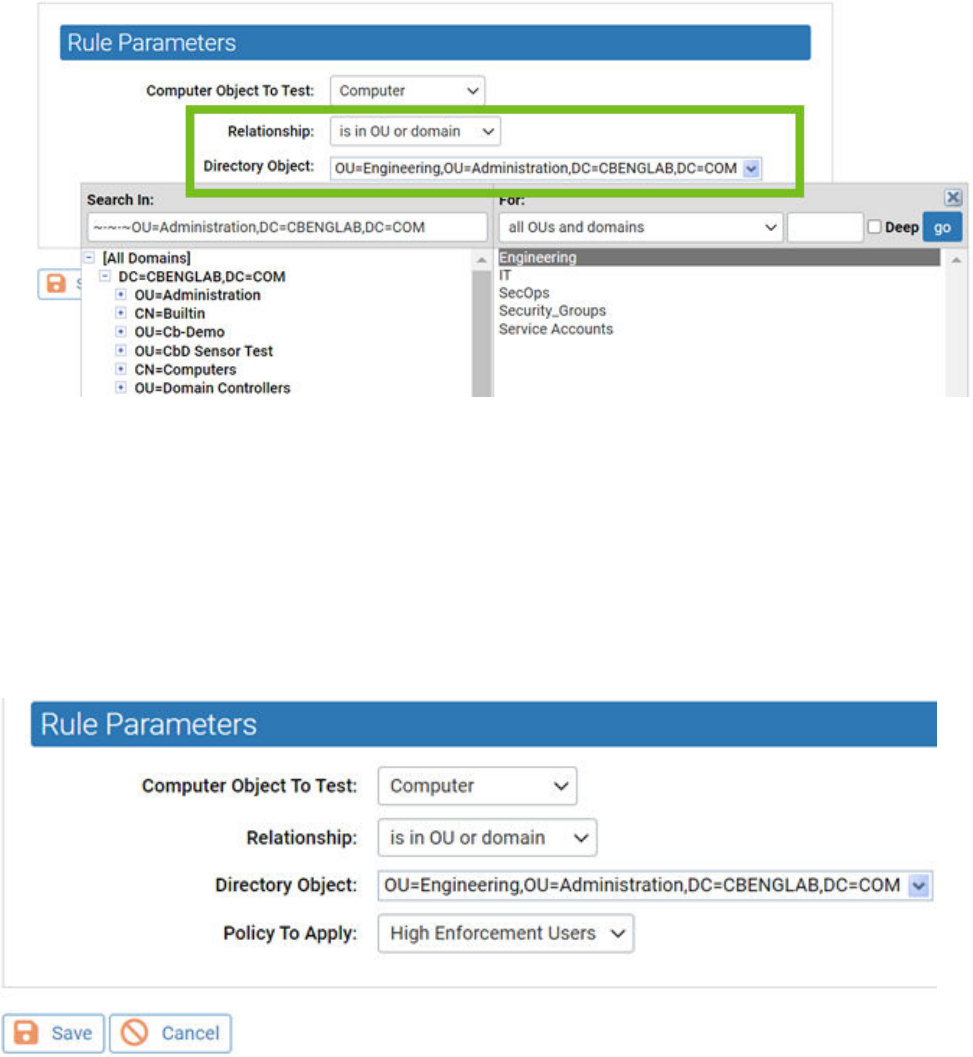
c If you see the object in the right panel that you want to use for this rule, double-click it.
The object, including full information about its location in the AD object tree, appears in
the Directory Object field of the Rule Parameters panel and the browser will close.
d If your actions did not automatically close the browser, click the X button in the top right
corner to close it.
There are additional options for using the directory object browser. See AD Object Browser
Options for more information.
7 From the Policy to Apply dropdown menu, select the policy you want assigned to computers
that meet the requirements of this rule. Only existing policies appear on the dropdown — if
the policy for this rule has not been created yet, cancel the creation of this rule and go to the
Policies page to create the new policy.
Carbon Black App Control Agent Installation Guide
VMware by Broadcom 18
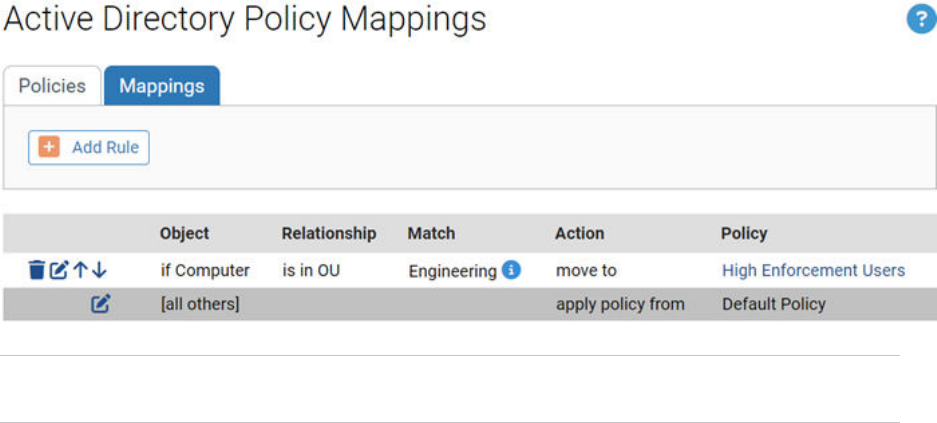
8 When you have entered all of the parameters for the rule, click Save. A newly created rule
goes to the bottom of the table of AD rules, just above the default rule, and all rules above
it take precedence. In the example, the rule instructs the Carbon Black App Control server to
assign any computer belonging to the Engineering OU in the domain hq.xyzcorp.local to the
Research Group policy.
Tip Rolling the mouse cursor over the i button next to an object in the Match column
provides a description of the object.
9 When you have additional rules, if necessary, use the up- and down-arrow buttons on the left
side of each rule (or the drag-and-drop method) to change the order in which the rules are
evaluated against a computer. Remember that the [all others] rule always is the last one in
the table.
10 Repeat this procedure beginning with Step 3 for any other rules you need to create.
Mapping Rule Ranking
AD Mapping rules are scanned in top-to-bottom order on the Mappings page, and only the first
match on the list is applied. You can rearrange the order of rules if you prefer a different policy
assignment outcome than you are seeing.
There is a default AD Mapping rule that cannot be deleted, nor can it be moved from the bottom
of the Policy Mappings Rule table. It maps “[all others]”, that is, all endpoints that have not
matched any of the other rules in the table, to the policy you select. Because it remains at the
bottom of the table, it assures that any automatically mapped endpoint is assigned to some
policy. It is initially mapped to the Default Policy, but you can change this. Creation of an “AD
Default Policy” is recommended so that endpoints not matching other rules have a policy that
best reflects a default security level that has your preferred settings.
AD Object Browser Options
This topic describes object AD object browser options.
Carbon Black App Control Agent Installation Guide
VMware by Broadcom 19
The left panel of the AD Object browser is where you determine the scope of your search. It
displays an AD tree with [All Domains] at the top of the tree . It then shows the contents of the
tree in standard browser format, with +/- buttons at each node that contains other objects so
that you can collapse or expand the tree at that point.
The right panel has a description of what you are searching for, based on the Relationship value
in the Active Directory Policy Rule parameters. When you click a node in the tree on the left, all
objects immediately under that node matching the Relationship (for example, OUs and domains)
display in the right panel. You can click an object in the right panel to select it and enter it in the
Rule Parameters panel.
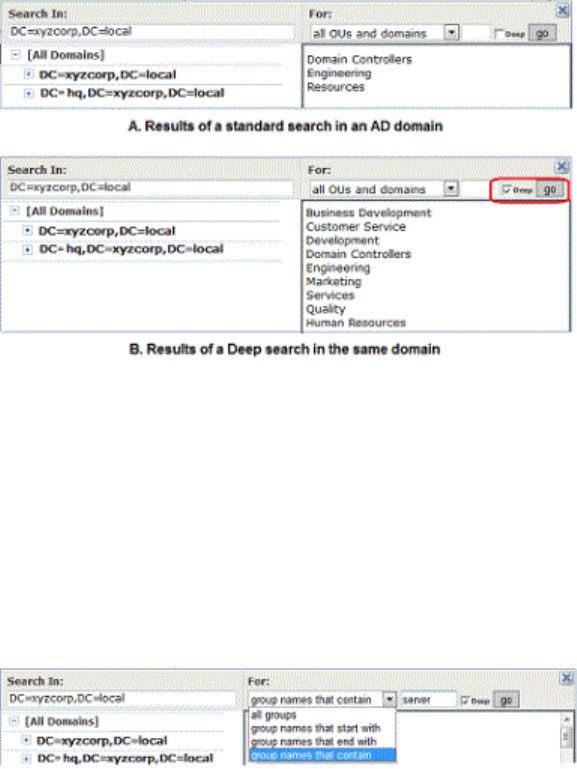
Object Search Depth
In the upper right area of the browser, there is a checkbox labeled Deep. When you select
the Deep checkbox and click Go, a multi-level search examines the immediate contents of the
selected node and the contents of any nodes inside it, regardless of how many layers deep they
are. For example, notice the greater number of results in the right panel of case B in the following
illustration.
Object String Match
Another option in the AD Object browser is to search by string match. If you enter a string of
characters in the textbox immediately to the left of the Deep checkbox, you can search for AD
objects in the selected node that start with, end with, or contain the string. You determine how to
use the string by using the dropdown menu to the left of the text box. For example, if you enter
“eng” in the text box and then searched for group names that contain the string, you would
match both “Engineering” and “System Engineering” groups (if they existed in the node selected
on the left).
Carbon Black App Control Agent Installation Guide
VMware by Broadcom 20

Endpoint Registration and AD Mapping
Certain events trigger registration of a the agent on an endpoint with its Carbon Black App
Control server. When this occurs, the following conditions can affect AD policy mapping.
n When the Carbon Black App Control agent is first installed, the endpoint will register with the
server for the first time with the users that are logged on at the time. If no users have logged
on since the last time this endpoint was started, the Carbon Black App Control server shows
an empty user list for that agent endpoint.
n When an agent endpoint is restarted, if the Carbon Black App Control agent reconnects to
the server before any user logs in, the user list for that registration will be empty.
n All agent endpoints (whether or not they use automatic policy assignment) re-register when
their list of user sessions changes.
Note Because of the way in which Windows handles sessions, a user’s session on a
Windows endpoint does not necessarily end upon logout. It persists until it is replaced by
a different user's session.
n Agent endpoints are disconnected by the server whenever the server restarts and re-
registered when they reconnect to the server.
n The server disconnects an endpoint (forcing re-registration) when the agent endpoint’s policy
assignment is changed manually, or if it is changed from manual to automatic.
Clearing the Server AD Cache
The AD information that is used to map agent endpoints to policies is cached on the Carbon
Black App Control server and updated every four hours. It is also updated when a Carbon Black
App Control rule change occurs that is related to AD mapping.
f you make a change to this AD information on your AD server — for example, changing
the group a computer or user is in, or adding an endpoint — this information normally does
not become available to the Carbon Black App Control server until the next scheduled cache
upgrade. If you have made relevant changes or if you see incorrect policy mapping, you can
clear the server cache so that the Carbon Black App Control server immediately begins updating
AD information.
To clear the server cache and update AD information, on the Mappings tab of the Policies page,
click Clear Server Cache in the Actions menu.
Viewing AD Computer Details in the Console
If you have integrated AD and Carbon Black App Control server, anytime an endpoint name in an
AD domain appears in a table in the Carbon Black App Control console, you can view additional
information by clicking on that endpoint name. For example, if you display the Events page, some
events include the endpoint that is associated with the event.
Carbon Black App Control Agent Installation Guide
VMware by Broadcom 21

If the name is identified as an AD endpoint name, it is highlighted in blue, and when you click
it, the Computer Details page displays. If you click the AD Details tab on this page, the AD
information that is available for that endpoint is displayed.
Similar information is displayed about a user when you click on a highlighted AD username in a
console table.
Uploading Agent Installers and Rules to the Server
Beginning with Carbon Black App Control 8.1.4, agent installers and the rule file that determines
their behavior are no longer included as part of an Carbon Black App Control server installation.
You must upload rule and agent installer packages separately after you install the server.
This methodology allows Carbon Black more flexibility to make improved agents and new rules
available independent of server releases.
As part of this enhancement, Carbon Black App Control includes a new drag-and-drop interface
to add new rule files and agent installers to your server as they become available. This eliminates
complex and error-prone manual installation procedures.
A user must have Manage system configuration permissions to upload and install agent installers
and rule files.These files are available on the Carbon Black User Exchange. If you have enabled
the Carbon Black File Reputation (CDC) connection from your server and the health indicators
option within the CDC, a health indicator will inform you when agent installers or rule files newer
than the ones you currently have are available.
Important When new rule files and agent installers are uploaded and installed on the server, the
server service is restarted and agent installation package generation is enabled.
However, automatic agent upgrades are also disabled when you upload a new agent installer
(but not a rules file) so they must be re-enabled if you are planning to use automatic upgrades.
Note
n The installers for rule files and agent packages found on the User Exchange are strictly for
upload to the server. They cannot be used directly to install or update agents on endpoints.
n Rule file and agent package installers for upload to the server cannot be installed on pre-8.1.4
servers.
n Rules and agent installation packages must be uploaded to the server one file at a time. If you
drag multiple files into the upload interface simultaneously, the uploads will fail.
n When you use the Update Agent/Rule Version page to upload agent package installers,
generation of agent installer for endpoints is enabled on the server. However, if you use other
methods to update or add agent installers, the installers will not automatically be generated
on the server.
Carbon Black App Control Agent Installation Guide
VMware by Broadcom 22

Upload Agent Installer Packages to Server
Perform the following procedure to upload installers for rule files and agent packages to a
Carbon Black App Control server.
Procedure
1 Log in to the Carbon Black User Exchange and locate the new rules file and agent installer
packages. Links to these packages are found on the Documentation & Downloads area for
Carbon Black App Control on the User Exchange.
2 Download the rules file installer and the agent installer packages for each OS platform in your
environment to a file system that is on or accessible to your Carbon Black App Control server.
These files are named as follows:
n Rules file installer – RulesInstaller.exe
n Windows agent installer – WindowsHostPackageInstaller.exe
n Linux agent installer – LinuxHostPackageInstaller.exe
n macOS agent installer – MacHostPackageInstaller.exe
3 Log into your Carbon Black App Control server using an account that has Manage system
configuration permissions.
4 In the console menu, click on the configuration (gear) icon and click Update Agent / Rule
Versions.
5 To install a new rules file on the server, drag the RulesInstaller.exe file from your
download folder into the target zone on the Update Agent / Rule Versions page, or click
Select a file to find the file by using a browser
Important If you are updating the rules file, do not attempt to simultaneously upload any
agent files. Each file upload must be complete before the next one is started.
When the upload begins, the server checks to see whether the package is correctly signed. If
it is, it is installed on the server. Messages report on each stage of the progress (or failure) of
the upload and installation.
6 When the rules upload is complete, repeat the file drag-and-drop or selection process for
each agent installer package to upload to your server.
Important
n Do not simultaneously upload multiple agent files. Each file upload must be complete
before the next one is started. The server restarts after each upload. A success message
appears when the new agent installer package is available.
n Remain on the Update Agent / Rule Version page while uploads are proceeding. You can
go to other pages, but since the server is restarted after the upload, activity on another
page can be interrupted at an unpredictable point.
Carbon Black App Control Agent Installation Guide
VMware by Broadcom 23

7 After you have finished uploading rules files and agent installers to a server:
a f you are setting up a new server, set up the policies to control your agents. See
"Creating and Configuring Policies" in the
Carbon Black App Control User Guide
.
b Choose a policy assignment method. See Assigning Endpoints to a Policy.
c Install agents on endpoints. See:
n Downloading Agent Installers
n Chapter 2 About Installing Agents on Endpoints
n Install Windows Agents on Endpoints
n Install Linux Agents on Endpoints
n Install macOS Agents on Endpoints
n Chapter 6 Verify the Agent Installation
n Chapter 7 Post-installation Activities
d If you are uploading new agent installers or rules files on an existing server, begin
upgrading agents according to the upgrade plan appropriate to your site. See Chapter
8 Upgrading Agents on Endpoints.
What to do next
Note If you are using Unified Management to manage multiple Carbon Black App Control
servers, you must upload new rule and agent packages to each server separately. The
management server does not broadcast these packages to the managed servers.
View Current Agent Versions and Package Generation Status
If you have System Health indicators enabled, you are notified when your agent or rule installer
versions are out of date. With or without System Health indicators enabled, you can view the
current versions of agent and rule installers in the Carbon Black App Control console. You can
compare them to the latest versions on the Release Information and Downloads on VMware
Docs.
Tip You can compare them to the latest versions on the Release Information and Downloads on
VMware Docs.
Procedure
1 On the console menu, click Rules > Policies. The Policies page displays.
Carbon Black App Control Agent Installation Guide
VMware by Broadcom 24
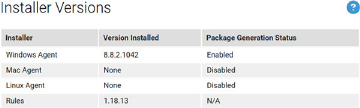
2 On the Policies page, click the following link: Click here to view available Carbon Black App
Control Agent / Rules versions. The Installer Versions page displays.
3 Review the version numbers and any status messages for the rules and agent installers.
The Installer Version page shows two key pieces of information for the Windows Agent
installer, macOS Agent installer, Linux Agent installer, and Rules installer that are currently on
the server:
n Version Installed – This is either a version number for the installer in each category, or
None if there is no installer for that item.
n Package Generation Status – Indicates whether installation packages (that is, the
installers that are used on endpoints) are being generated. Even if there is an agent
installer for a platform (for example, Linux) available on the server, generation of the
installer that will be used on the endpoint might be disabled for that platform. Possible
status messages are:
n Enabled – Indicates that a Rules file is available and agent package generation is
enabled for the agent on this platform.
n Disabled – This indicates that agent package generation is disabled. If a version
number displays in the Version Installed column, generation is disabled by a setting
on a hidden page in the console. If Version Installed shows None, generation is
disabled because the agent package for that platform was never installed.
n Disabled due to missing default rules – Indicates that an installer version is uploaded
for the agent on this platform, but installers for endpoints cannot be generated
because no Rules file is uploaded to the server.
n N/A – This appears for the Rules file because package generation is unnecessary for
rules.
4 When you have finished reviewing the versions, click the Go back to the policies page link or
use the console menu to navigate elsewhere.
Downloading Agent Installers
When you create a new policy, the Carbon Black App Control server generates a policy-specific
agent installer for each agent platform and posts it to an agent download area. Each installer
specifies the policy, policy settings, Enforcement Level, and the address of the server managing
the agent.
Carbon Black App Control Agent Installation Guide
VMware by Broadcom 25
When the Carbon Black App Control server is upgraded, agent installers are not automatically
upgraded; you must upgrade agents separately. Depending upon your upgrade plans, you might
download and install the new agent version on the endpoint, or allow the Carbon Black App
Control server to manage the upgrade. See Chapter 8 Upgrading Agents on Endpoints for more
details.
Carbon Black App Control agent installers are created in a file format that is appropriate for each
platform:
n MSI (Microsoft installer) packages for Windows
n ZIP archives for Windows (available only for Windows agent version 8.7.4 and above)
n TGZ archives for Linux
n DMG files for macOS
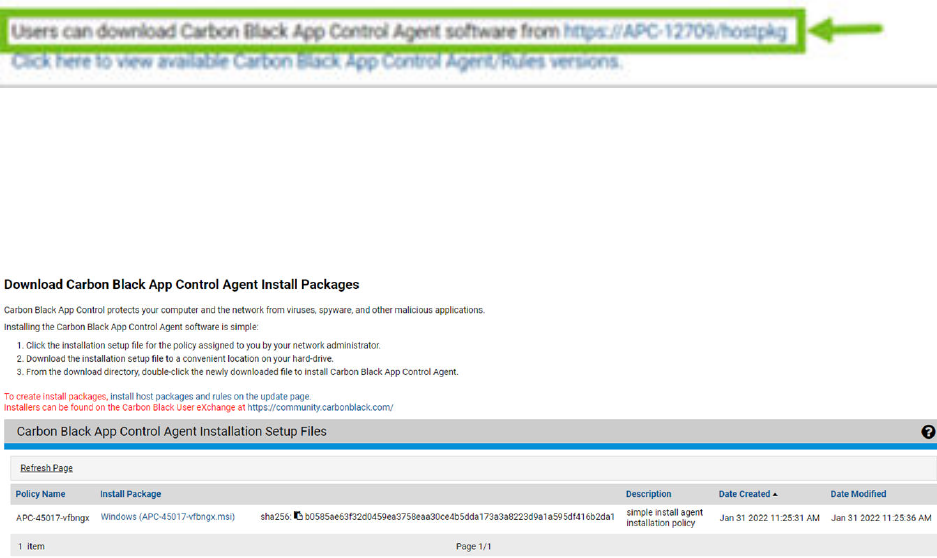
The download page for these packages is accessible through a URL on the server. You can
bookmark this URL and access the page without logging into the console.
Download an Agent Installer
Perform the following procedure to download a Carbon Black App Control agent installer.
Procedure
1 In the console menu, click Rules > Policies. The Policies page displays, with a message and
link at the top:
2 On the Policies page, click the download link at the top of the page.
The publicly accessible URL for this page takes the following format:
https://
server_name
/hostpkg
The Download Agent Install Packages page displays:
3 In the Agent Installation Setup Files table, locate the installer file by policy name.
Carbon Black App Control Agent Installation Guide
VMware by Broadcom 26
4 To download the installer, click the platform name (for example, Windows) for the endpoint
on which you want to install the agent; save the file.
5 When the download is complete, optionally verify the package integrity. See:
n Verify the Windows Agent Digital Signatures
n macOS Agent Installer Integrity and Signature Verification
Verify the Windows Agent Digital Signatures
Windows agent software is available in two different formats: ZIP and MSI. The MSI package
combines the agent software together with policy information and packages into a Windows
installer that the Carbon Black App Control server generates. This package is not signed by the
server.
The ZIP file contains a Carbon Black signed MSI that contains the agent software and the files
that are associated with the policy information. The signed MSI can be verified using a signing
tool like Microsoft's Signtool.
Procedure
1 Download the Microsoft Windows SDK.
2 Install all components of the SDK.
SignTool is usually installed under C:\Program Files (x86)\Windows Kits\10\bin, but
the exact location depends on the version of the SDK and your operating system. For
example, it can be installed in any of the following locations:
n C:\Program Files (x86)\Windows Kits\10\App Certification
Kit\signtool.exe
n C:\Program Files (x86)\Windows Kits\10\bin\x86\signtool.exe
n C:\Program Files (x86)\Windows Kits\10\bin\x64\signtool.exe
3 Add the location of the Signtool binary to your PATH environment variable.
a Press the Windows key.
b Type env.
c Click Edit the System Environment Variables.
d Click Environmental Variables.
e Select Path and click Edit.
Carbon Black App Control Agent Installation Guide
VMware by Broadcom 27
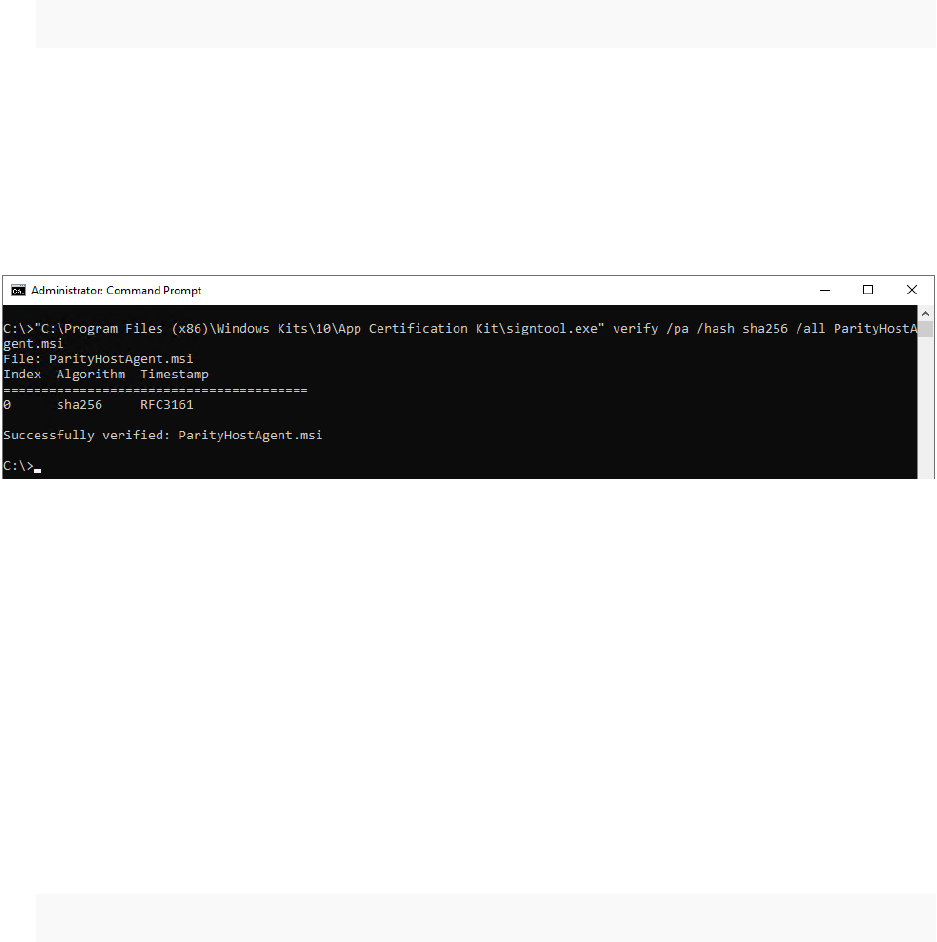
f At the end of the existing value, add the Signtool location. A semicolon (;) must separate
the old value from the new value. For example:
n old value = %USERPROFILE%\AppData\Local\Microsoft\WindowsApps;
n new value = %USERPROFILE%
\AppData\Local\Microsoft\WindowsApps;C:\Program Files (x86)\Windows
Kits\10\App Certification Kit\
g Click OK three times to save your changes and exit the editor.
4 Run the following command, where
$file_to_verify
is the name of the install package:
signtool.exe verify /pa /hash SHA56 /all $file_to_verify
n The /pa parameter instructs Signtool to check for code signing.
n An optional /hash SHA256 parameter instructs Signtool to only check the SHA256
signatures.
n The /all parameter instructs Signtool to check all signatures on the file.
Results
macOS Agent Installer Integrity and Signature Verification
After you download the macOS Agent installer, verify the package integrity. As an additional
security measure, you can verify the digital signature of the internal binaries.
n To verify package integrity: use steps 1 and 2.
n To verify the digital signatures of the internal binaries, do one or both of the following:
n using the codesign command: use steps 3 and 4.
n using the spctl command: use steps 3 and 5.
Procedure
1 Execute the following command to verify the integrity of the macOS Agent Installer package:
%pkgutil –check-signature ./${Mac_Package}
Carbon Black App Control Agent Installation Guide
VMware by Broadcom 28
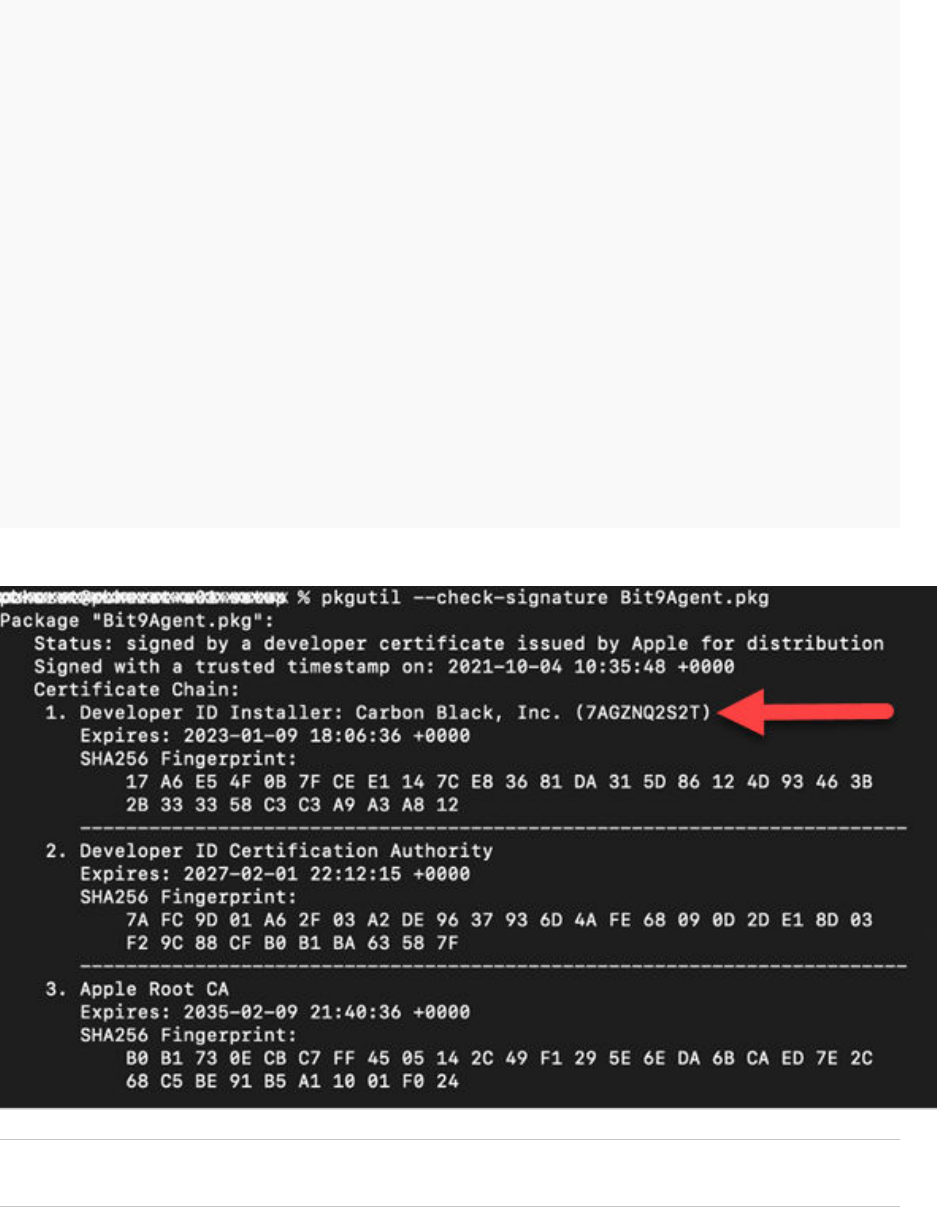
The result of the command should be similar to the following text:
Package "./${Mac_Package}":
Status: signed by a developer certificate issued by Apple for distribution
Signed with a trusted timestamp on: 2021-10-04 10:35:48 +0000
Certificate Chain:
1. Developer ID Installer: Carbon Black, Inc. (7AGZNQ2S2T)
Expires: 2023-01-09 18:06:36 +0000
SHA256 Fingerprint:
17 A6 E5 4F 0B 7F CE E1 14 7C E8 36 81 DA 31 5D 86 12 4D 93 46 3B
2B 33 33 58 C3 C3 A9 A3 A8 12
------------------------------------------------------------------------
2. Developer ID Certification Authority
Expires: 2027-02-01 22:12:15 +0000
SHA256 Fingerprint:
7A FC 9D 01 A6 2F 03 A2 DE 96 37 93 6D 4A FE 68 09 0D 2D E1 8D 03
F2 9C 88 CF B0 B1 BA 63 58 7F
------------------------------------------------------------------------
3. Apple Root CA
Expires: 2035-02-09 21:40:36 +0000
SHA256 Fingerprint:
B0 B1 73 0E CB C7 FF 45 05 14 2C 49 F1 29 5E 6E DA 6B CA ED 7E 2C
68 C5 BE 91 B5 A1 10 01 F0 24
2 Verify that the Certificate Chain Developer ID Installer is: Carbon Black, Inc.(7AGZNQ2S2T).
Warning If the Certificate Chain Developer ID Installer value is not a match, do not proceed
and contact Carbon Black Support.
Carbon Black App Control Agent Installation Guide
VMware by Broadcom 29

3 To verify the digital signatures of the internal binaries, you must first extract the main
packages and internal packages.
Binaries in the macOS Agent Installer package:
n appc-es-loader.app
n b9cli
n b9daemon
n b9kernel.kext
n b9notifier.app
n libcrypto.dylib
n libssl.dylib
Use the following set of commands to extract each of the main and internal packages:
pkgutil --expand Bit9Agent.pkg pkg_tmp
cd pkg_tmp
cd b9kernel.pkg
tar xvf Payload
cd ..
cd bit9.pkg
tar xvf Payload
4 To use the codesign command to verify the digital signature of the binaries:
%codesign -vvvv -R="notarized" --check-notarization ./${Mac_Binary}
The result of the command should be:
host-a01:$ codesign -vvvv -R="notarized" --check-notarization ./${Mac_Binary}
./${Mac_Binary} : valid on disk
./${Mac_Binary} : satisfies its Designated Requirement
./${Mac_Binary} : explicit requirement satisfied
A file without signing and notarization does not run on macOS. In this case, the following
output displays:
% codesign -vvvv -R="notarized" --check-notarization ./${Mac_Binary}
./${Mac_Binary} code object is not signed at all
In architecture: x86_64
Carbon Black App Control Agent Installation Guide
VMware by Broadcom 30

The following image shows verification of all binaries in the Bit9Agent package using the
codesign command:
5 To use the spctl command to verify the digital signatures of the binaries, use the following
command:
% spctl -a -t exec -vvv ./${Mac_Binary}
The result of the command should be:
./${Mac_Binary}: accepted
source=Notarized Developer ID
origin=Developer ID Application: Carbon Black, Inc. (7AGZNQ2S2T)
If the binary does not belong to any .app package, the output shows:
rejected (the code is valid but does not seem to be an
app)
% spctl -a -t exec -vvv ./${Mac_Binary}
./${Mac_Binary} : rejected (the code is valid but does not seem to be an app)
origin=Developer ID Application: Carbon Black, Inc. (7AGZNQ2S2T)
As shown in the following image, rejected output is shown for all binaries except .app files.
In this case, the file is valid — rejection is because file is not an app. Instead of looking
at rejected, you can verify that the Developer ID Application equals: Carbon Black, Inc.
(7AGZNQ2S2T).
Carbon Black App Control Agent Installation Guide
VMware by Broadcom 31
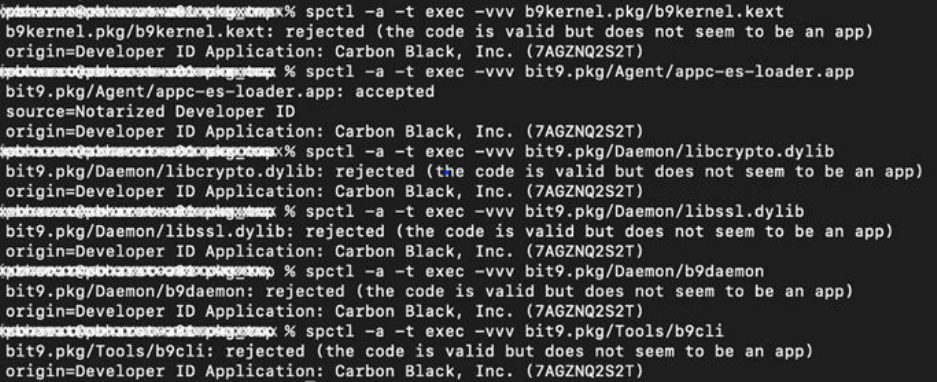
The following image shows verification of all the binaries in the Bit9Agent package using the
spctl command.
Carbon Black App Control Agent Installation Guide
VMware by Broadcom 32
About Installing Agents on
Endpoints
2
Before installing a new Carbon Black App Control agent on any platform, review the following
considerations.
n The agent is a per-system application, not per-user.
n Installing Carbon Black App Control agents on containers is not supported.
n Make sure the computer and operating system on which you are installing the agent
is supported. See the following Operating Environment Requirements guides for agent
hardware requirements and supported OS versions:
n Carbon Black App Control Windows Agent (on Windows Desktop) Operating
Environment Requirements
n Carbon Black App Control Windows Agent (on Windows Server) Operating Environment
Requirements
n Carbon Black App Control Windows Agent (Embedded) Operating Environment
Requirements
n Carbon Black App Control Linux Agent Operating Environment Requirements
n Carbon Black App Control macOS Agent Operating Environment Requirements
n The Carbon Black App Control agent installation process is non-interactive; it requires no
user input. As soon as installation is completed, the Carbon Black App Control agent begins
working — no additional configuration is needed, and in most cases a restart is unnecessary.
n As soon as the agent is installed, the computer is protected by a security policy, and the
agent connects to the server and begins initializing files. Because initialization can involve
significant data flow between the server and its new clients, consider your network capacity
and number of files when planning agent roll-out. Simultaneous agent installation on all
endpoints on a large network is not recommended.
n If you are configuring your App Control Server for the first time, consider setting up a
reference computer with files you know you want to globally approve; you can also use
that computer as a baseline for measuring any file inventory drift. See "Monitoring Change:
Baseline Drift Reports" in the
Carbon Black App Control User Guide
.
VMware by Broadcom
33

n Decide how the agent will be installed on this system. You can choose from the following
options:
n Use an existing software deployment mechanism. Although new agent installations are
normally done in non-interactive mode, you can optionally create an interactive end-user
installation experience. If you use a third-party distribution system to install agents, follow
all recommended procedures. For Windows installations, disable any possible MSI or MSP
transformations inside your distribution system (such as SCCM).
n Have a system administrator or other qualified person manually install the agent software
on each endpoint.
n Allow users to install the agent software themselves. Send e-mail to users associated with
each policy, and instruct them to browse to the agent download URL or another shared
location, download the specific installer file for their policy, and run the installation on
their computers. No interaction is needed – the installation runs without prompts and then
the agent begins to initialize files.
n The agent installer must be run by a user with the appropriate administrative rights. On
Windows, this can be either by Local System or by a user account that has administrative
rights and a loadable user profile. On macOS and Linux, the user must be able to use sudo.
n Make sure your server has the latest agents and rules; see Uploading Agent Installers and
Rules to the Server.
n Be sure to download the correct installation package for your policy and platform; see
Downloading Agent Installers. If you are using AD-based policy assignment, a platform-
specific agent installer for any policy that allows automatic policy assignment can be used.
n Although the console prevents creation of policies whose names have generally known
invalid characters, examine the policy name to see whether it contains characters that might
require special handling (such as escaping in a command line) on your specific platform.
n If Microsoft OneDrive™ is in use, only the default path is supported:
(c:\users\<username>\OneDrive)
Custom OneDrive paths are not supported.
During Initialization, the App Control agent will ignore the One Drive directory, thus leaving all
of the files inside it as unknown.
Note
n Carbon Black does not recommend storing executables in the cloud. In the event that a file is
executed from the cloud, the agent treats the file as unknown.
n Support for OneDrive is enabled by default. To disable OneDrive support, contact Carbon
Black Support.
Carbon Black App Control Agent Installation Guide
VMware by Broadcom 34

Installing Windows Agents on
Endpoints
3
As an MSI package or a ZIP archive, you can customize an agent installer for Windows, including
modification of the installation directory.
Refer to the Microsoft MSI documentation for information about configuration options. The
installer for Windows is named in the following way, varying by policy:
n policyname.msi
n policyname.zip
Note
n The use of Windows Installer Transform files (.mst) is not supported with the agent installer
on Windows clients.
n Windows Installer Patch files (.msp) are no longer used for build-to-build agent upgrades. Be
sure to update any scripts that refer to these files.
n Make sure that the agent is being installed on a supported Windows operating system. See:
n Carbon Black App Control Windows Agent (on Windows Desktop) Operating
Environment Requirements
n Carbon Black App Control Windows Agent (on Windows Server) Operating Environment
Requirements
n Carbon Black App Control Windows Agent (Embedded) Operating Environment
Requirements
n See also the Release Notes at Carbon Black App Control Documentation for your version
of Carbon Black App Control for any special considerations.
Read the following topics next:
n Considerations When Installing an Agent using Group Policy
n Install Windows Agents on Endpoints
n Command Line Installations of Windows Agents
n Conditions Requiring Reboot after Installation
VMware by Broadcom
35

Considerations When Installing an Agent using Group Policy
You can deploy a Carbon Black App Control agent using a Group Policy Object (GPO).
Using Group Policy to deploy software is a common method that is well documented. For
example, see How to use Group Policy to remotely install software in Windows Server
Some network latency issues have occasionally been reported when deploying agents using a
GPO. If you intend to deploy your Carbon Black App Control agents by using a GPO, please
consider the following:
n Make sure that the MSI is copied to a local drive and called with a fully-qualified path.
n Do not let the deployment monitor for the presence of the expected version. This will break
upgrades that are deployed through the console because SCCM, etc. will want to roll back
any upgrades.
n Disable any MSI or MSP transformations inside your distribution system.
n To reduce network traffic, copy the installer first and then install the agent locally.
Finally, if you continue to experience network latency issues after implementing the previous
suggestions, consider wrapping the agent installer in another script. This is most commonly done
by using a batch file that copies the installer locally and then executes it. For example:
@ECHO OFF
COPY "\\network_location\folder\bit9_agent_install.msi" "%WINDIR%\Temp\bit9_agent_install.msi"
msiexec /i "%WINDIR%\Temp\bit9_agent_install.msi" /qn /l*v+"%WINDIR%
\Temp\bit9_agent_install_log.txt"
If you continue to experience problems deploying the installer using a GPO, contact Carbon Black
Support.
Install Windows Agents on Endpoints
Perform the following procedure to install a Windows agent on an endpoint.
Prerequisites
For ZIP archive: Extract policyname.zip to a folder. It will contain a signed
ParityHostAgent.msi file together with other files that contain configurations and settings.
This collection of files must remain together for the installation to succeed.
Caution The Carbon Black App Control Windows 8.9.0 Agent can prevent process hollowing. If
you have both Carbon Black App Control and Carbon Black Cloud installed, it is recommended
not to have both products configured to prevent process hollowing.
Carbon Black App Control Agent Installation Guide
VMware by Broadcom 36
Procedure
1 On the endpoint, run the Windows agent installer. You can use any standard means for
installing using MSI files, with the following considerations:
n The default agent application directory is C:\Program Files\Bit9\Parity Agent for
32-bit systems and C:\Program Files (X86)\Bit9\Parity Agent for 64-bit systems.
To change the installation directory, perform the installation from the command line using
the appropriate MSI command-line options.
n To accept the default application directory, use any MSI installation method, including
double-clicking the MSI filename.
n If you are installing the agent manually or by using a third-party distribution system and
want to specify a non-default data directory, do not choose a data directory that is below
the main program installation directory. Putting the data directory under the installation
directory will cause the agent to malfunction and disconnect.
During Windows agent installation, the installer displays a message dialog that closes
automatically when installation is complete. This dialog includes a Cancel button, so you can
end the installation before it completes if necessary.
2 To verify the agent installation, open Task Manager and click the Services tab. You should
see Parity running.
3 If you run anti-virus (AV) software, exclude the Carbon Black App Control agent installation
directory from anti-virus scanning. For enhanced security, Carbon Black App Control protects
its application directory. To avoid performance issues, configure your AV software so that
the following files and directories are not scanned or blocked:
n Parity.exe – the agent process
n Program Files\Bit9 – the default agent program directory on 32-bit systems; if you did
not use the default directory, substitute the directory you selected
n Program Files (x86)\Bit9 – the default agent program directory on 64-bit systems; if
you did not use the default directory, substitute the directory you selected
n ProgramData\Bit9\Parity Agent – the default agent data directory on Vista, Windows
7, 8 and 10, and Windows Server 2008 through 2016 systems; if you did not use the
default directory, substitute the directory you selected
n \Documents and Settings\All Users\Application Data\Bit9\Parity Agent –
default agent data directory for supported operating systems not listed in the previous
item
4 Firewalls often recognize the agent as a new application and block access to the network.
Instruct users to permanently allow the agent to have access.
Carbon Black App Control Agent Installation Guide
VMware by Broadcom 37

Command Line Installations of Windows Agents
You can install or upgrade agents using MSIEXEC commands, either manually or with third-party
software distribution tools.
In some cases, you install or upgrade agents by using an installer that was created in the
Carbon Black App Control console for a specific policy, in which case the policy and server
information is built into the installer. In other cases, you might use the “unbranded” agent
installer, ParityHostAgent.msi, which does not include this information. With the unbranded
installer, you can provide custom parameters.
To create custom MSIEXEC commands for agent installation, be aware of the standard MSIEXEC
parameters youcan use, such as /quiet or /qn for automatic installations without prompts. See
https://technet.microsoft.com/en-us/library/bb490936.aspx for a list of those parameters.
In addition to standard MSIEXEC syntax, you must use parameters that are specific to Carbon
Black App Control agent installation. The following table shows these parameters. They can be
used to modify an agent installation in various ways.
Example: The following syntax installs an agent and overrides the server defaults to connect to a
specific server:
msiexec /i ParityHostAgent.msi B9_SERVER_PORT=41002 B9_SERVER_ID={b9}Fkmv+XIVXwjg7654AB2oxgxh/
qxs8tsPGbX1Dabi19xs B9_SERVER_IP=newserver.mycorp.local
Carbon Black App Control Agent Installation Guide
VMware by Broadcom 38

Table 3-1. Specific Parameters for Agent
Parameter Description and Example
B9_CONFIG This parameter lets you specify the location of the
configlist.xml file when installing or upgrading
an agent using an unbranded package. The
configlist.xml file contains all of the Carbon Black App
Control rules, such as file approvals and bans, that are
created on the server and applied to the agent. The agent
can download the configlist from the server after it is
connected, but because there is a delay before it can
complete the download, it is typically best to import all
the rules immediately during agent installation.
This option requires an additional URL argument (or a
local path) added to the MSIEXEC command to indicate of
the location of the configlist.xml file that the installer
should use.
Example:
B9_CONFIG=https://<serveraddress>/hostpkg/
pkg.php?pkg=configlist.xml
Important This setting is not for use with a “branded”
agent installation package (that is, one that is specific to a
policy).
B9_NOCONFIG This parameter specifies to not download all of the
Carbon Black App Control rule information at the same
time as agent installation or upgrade. In this case, you
must rely on the agent connecting to the server later and
downloading any rule changes.
Important This option is reasonably safe to use for
upgrades, which should already have nearly current rules.
It is not recommended for new installations because it can
result in agents not properly enforcing rules until they can
download them all from the server — an unpredictable
period of time. It is unnecessary for branded (policy-
specific) installation packages.
B9_SERVER_PORT For unbranded package installations, this parameter lets
you set the port for communication from the agent to the
server if the unbranded installer is used.
Example:
B9_SERVER_PORT=41002
Important This setting is for use with unbranded
installation packages or if you need to change this
parameter as part of repair or upgrade. It is not for use
with installations of a branded agent (that is, one that is
specific to a policy).
Carbon Black App Control Agent Installation Guide
VMware by Broadcom 39

Table 3-1. Specific Parameters for Agent (continued)
Parameter Description and Example
B9_SERVER_ID This parameter sets the value for the Carbon Black App
Control Server ID. Set during installation to manually
establish the ID setting if the msi package being used
is unbranded. This value is the Server ID property on
the support.php page in the console, in the Advanced
Configuration tab.
Example:
B9_SERVER_ID={b9}cu+ox2O9/
EvVtKe+eMlkwVqpiy+kJsgs+opq8jjFWZw=
Important This setting is for use with unbranded
installation packages. It is not for use with installations of
a branded agent (that is, one that is specific to a policy).
B9_SERVER_IP This parameter sets the address of the Carbon Black App
Control server. You can use it to manually establish the
location setting for unbranded agent installer packages.
Example:
B9_SERVER_IP=server2.mycorp.local
Important This setting is for use with unbranded
installation packages or if you need to change this
parameter as part of repair or upgrade. It is not for use
with installations of a branded agent (that is, one that is
specific to a policy).
B9_HOSTGROUP This parameter sets the policy for the agent. You can use
it to manually establish the policy setting for unbranded
agent installer packages.
Example:
B9_HOSTGROUP=Monitor
Important This setting is for use with the new
installations of the unbranded installation package. It does
not change policy during an upgrade, and if AD policy
assignment is enabled for this agent, the policy will be
changed according to your AD mapping rules.
Conditions Requiring Reboot after Installation
The agent installation process does not normally require a reboot after it is completed. However,
a reboot is required under the following conditions.
Carbon Black App Control Agent Installation Guide
VMware by Broadcom 40
n If you are using DFS and have installed an agent on a Windows 2003 or XP system, you
must reboot the endpoint to get full enforcement of Carbon Black App Control file rules.
Because of an operating system limitation, DFS operations (including file executions) cannot
be detected by the agent until the system has been rebooted. In this case, the Upgrade
Status column on the Computers page shows Reboot Required for the affected endpoint.
n On any version of Windows, if a file is in use by another application when the Carbon Black
App Control installer tries to write that file, the system schedules the file to be replaced on
next reboot, and the console shows Reboot Required for the affected endpoint.
Carbon Black App Control Agent Installation Guide
VMware by Broadcom 41

Installing Linux Agents on
Endpoints
4
For Linux endpoints, you install the Carbon Black App Control agent by running a script after
extracting the appropriate TGZ archive. Carbon Black App Control server supports agents on
Linux endpoints that are running Red Hat and CentOS versions, both of which use the same
installation file.
Make sure your Linux endpoint is compatible with the Carbon Black App Control agent; see
Carbon Black App Control Linux Agent Operating Environment Requirements.
See also the Release Notes at Carbon Black App Control Documentation for your version of
Carbon Black App Control for any special considerations.
Linux agent installation files are tarballs named by policy and operating system, such as
policyname-redhat.tgz.
Carbon Black recommends disabling Prelinking on RedHat and CentOS computers before
installing agents. Prelinking has negative impacts on performance and Carbon Black App Control
features (see the Release Notes at Carbon Black App Control Documentation). However, if you
must enable Prelinking on your RedHat and CentOS systems, enable the RedHat Prelinking
updater before installing agents. See "Approving by Updater" in the
Carbon Black App Control
User Guide
for instructions on enabling updaters.
Note Although not required for the initial agent installation, gawk and unzip are required for
Linux agent upgrades that are initiated by the Carbon Black App Control server. If necessary,
update the Linux distribution to include them before installing the agent.
The agent is normally installed with a GUI-based blocked file notifier. This notifier appears when
a user attempts to take an action that is either totally blocked by the agent or that requires a
user decision about allowing it to proceed. For Linux endpoints that are not running a graphic
interface package, or if you prefer to eliminate user interaction for some other reason, the agent
for Linux can be installed without the notifier. You can add the -n option as a flag on the
installation script command for the agent, as shown in Install Linux Agents on Endpoints.
On an endpoint that you run without the notifier, install an agent with a Low or High Enforcement
policy. Agents in Medium Enforcement policies prompt users to allow or block many actions, and
this prompt is not available without a notifier.
Read the following topics next:
n Install Linux Agents on Endpoints
VMware by Broadcom
42

n Enable Secure Boot for Linux Agents
Install Linux Agents on Endpoints
Perform the following procedure to install Linux agents on endpoints.
Prerequisites
The following procedure assumes you have already:
n uploaded agent and rule packages as described in Uploading Agent Installers and Rules to
the Server.
n created one or more security policies for your agents as described in "Creating and
Configuring Policies" in the
Carbon Black App Control User Guide
.
n downloaded the appropriate installer as described in Downloading Agent Installers.
n For AD-based policy assignment, use an installer for any policy with automatic policy
assignment enabled.
n The same downloaded agent installer can be used on multiple endpoints, and can also be
distributed to endpoints via SSH or other distribution mechanisms.
n If you intend to use SecureBoot, make sure the endpoint is prepared before installing the
Linux Agent. See: Enable Secure Boot for Linux Agents
Note SecureBoot is only available with Linux Agent 8.8.0+.
In addition, make sure that the user account being used to install the agent has administrative
rights, or that the user can use sudo.
Before you install the Carbon Black App Control agent on the Red Hat Enterprise Linux 9.0
Endpoint:
n Install the initscripts RPM manually or connect the host to Red Hat network.
n Upgrade the Carbon Black App Control server to version 8.9.0 or later.
n If you are using a Carbon Black App Control server deployed on Windows Server 2012,
please update the DH modulus to 2048 bytes as described in https://learn.microsoft.com/
en-us/security-updates/SecurityAdvisories/2016/3174644.
Procedure
1 Extract and uncompress the agent tarball archive for the policy for this computer. If the policy
name contains characters that are not accepted in command arguments, such as spaces or
parentheses, escape these characters with a backslash.
tar -xvzf <policyname>-redhat.tgz
Carbon Black App Control Agent Installation Guide
VMware by Broadcom 43

2 Change to the directory that matches the download tarball name.
cd <policyname>-redhat
3 Where the Carbon Black App Control Server version is earlier than 8.9.2, download the
Carbon Black App Control SHA256 based public key as bit9cs_sha2.asc and place it in the
same folder as b9install.sh.
4 For version 8.7.8, validate the b9install script with public key and detached signature with the
following commands:
gpg --dearmor bit9cs.asc
gpg --no-default-keyring --homedir . --keyring bit9cs.asc.gpg --verify b9install.asc
b9install.sh
If the result contains ( gpg: Good signature from "bit9build (bit9cs) ), then the script is valid
and you can proceed with the next steps.
5 For version 8.7.10 and later, validate the b9install script with public key and detached
signature with the following commands:
gpg --dearmor bit9cs_sha2.asc
gpg --no-default-keyring --homedir . --keyring bit9cs_sha2.asc.gpg --verify b9install.asc
b9install.sh
If the result contains ( gpg: Good signature from "bit9build (bit9cs) ), then the script is valid
and you can proceed with the next steps.
6 Use sudo to run the agent installation shell script using the selected shell, adding the -n
option if you do not want the blocked file notifier installed. For more information about the -n
option, see Chapter 4 Installing Linux Agents on Endpoints.
For example, to use the Bourne shell to install an agent:
sudo sh ./b9install.sh
-or for installation without the notifier-
sudo sh ./b9install.sh -n
Important If the output message states, "validation failed," it means that the rpm signature is
not valid.
Carbon Black App Control Agent Installation Guide
VMware by Broadcom 44

7 If you run anti-virus software, exclude the Carbon Black App Control agent installation
directory from anti-virus scanning. For enhanced security, Carbon Black App Control protects
its own application directory. To avoid performance problems, use whatever mechanism is
provided by your anti-virus software vendor to specify that the following directories or files
are not scanned:
n /opt/bit9/bin – the agent application and uninstall script
n /srv/bit9/data – the agent database and diagnostics logs
n /lib/modules/kernelversion/kernel/lib/b9kernal.ko – the agent kernel
n /etc/rc*/*b9daemon and /etc/init.d/b9daemon – the agent startup script
n /etc/X11/xinit/xinitrc.d/90b9notifier.sh – the Carbon Black App Control
blocked file notifier
8 Firewalls can recognize Carbon Black App Control software as a new application and block
access to the network. Instruct users running the agent to permanently allow it access.
9 To verify the agent installation, run ps aux | grep b9 in a command window. You should see
b9daemon running.
What to do next
See "Endpoint Notifiers and Approval Requests" in the
Carbon Black App Control User Guide
for
a description of what the user sees on an endpoint that is protected by the agent.
Enable Secure Boot for Linux Agents
You can use this procedure to enable secure boot on a Carbon Black App Control Linux Agents.
This feature is available only on agent version 8.8.0 and subsequent versions.
Prerequisites
In order to enable secure boot, you must first:
1 Download the public key used for signing App Control agent kernel modules.
a Log into the Broadcom customer portal and then select Cyber Security Software from the
drop-down at the top of the page.
Carbon Black App Control Agent Installation Guide
VMware by Broadcom 45
b Select My Downloads from the menu on the left to see the list of products that you are
entitled to download for the selected division.
Important If you do not see the product you are looking for in your download list, you
should contact Broadcom's Global Customer Assistance. Do one of the following:
n Call the support number here: https://support.broadcom.com/web/ecx/contact-
support
n Fill out this form: https://broadcomcms-software.wolkenservicedesk.com/web-form
c Navigate to, or search for the Carbon Black App Control Linux Agent and then select the
Agent you need to download.
The public key required to sign the App Control Linux Agent kernel modules is included in
the Linux Agent package.
In the example image below, you can see that the App Control Linux Agent
8.8.0 package contains both the installer package and the required signing key,
cb_kernel_mod_signing_key_pub.der, along with required SHA2 keys.
2 Download cb_kernel_mod_signing_key_pub.der.
3 Import the public key on the endpoint to authenticate and load agent kernel modules.
4 Install the Carbon Black App Control Linux Agent. See: Install Linux Agents on Endpoints.
Tip For additional assistance with downloads, see: Product Download Help.
Carbon Black App Control Agent Installation Guide
VMware by Broadcom 46
Procedure
1 Import your public key into the MOK list. The mokutil import command prompts you to enter
(create) a password.
This the same password you use while enrolling the key.
# mokutil --import cb_kernel_mod_signing_key_pub.der
input password:
input password again:
#
and
2 Reboot the machine and go to the endpoint machine console.
After rebooting, the UEFI SHIM should automatically start MokManager which is used to add
the MOK key to the UEFI Secure Boot key database.
3 Choose Enroll MOK.
4 Enter the password you previously associated with this request.
5 Confirm the enrollment by selecting Yes to Enroll the key(s).
Carbon Black App Control Agent Installation Guide
VMware by Broadcom 47
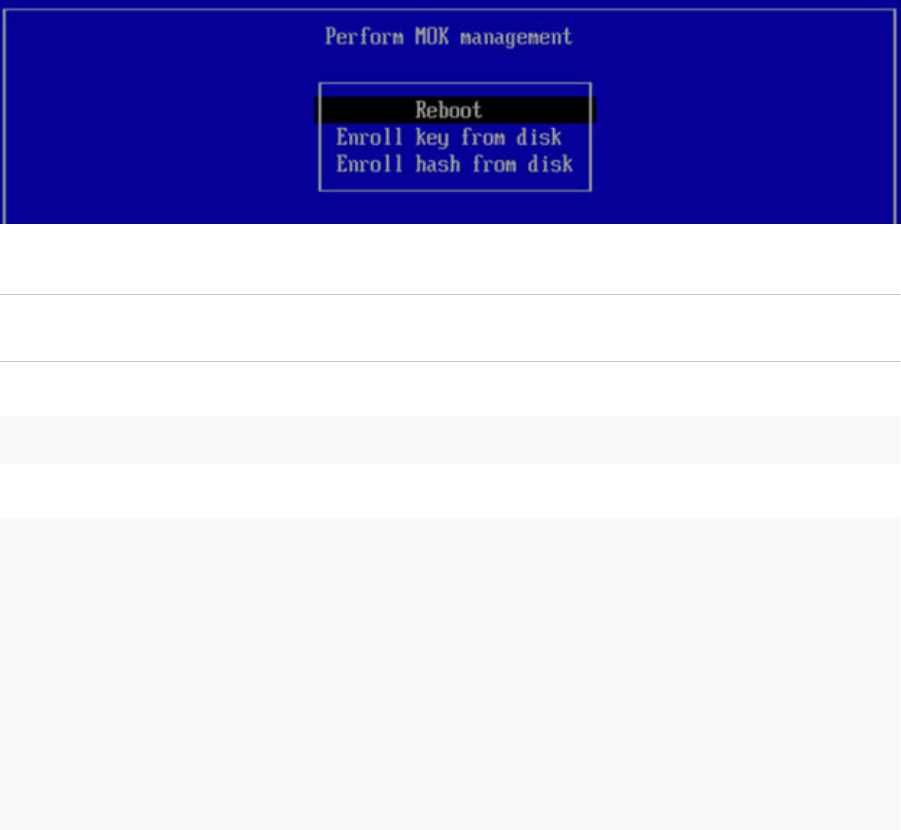
6 Reboot the machine.
Your public key is added to the MOK list, which is persistent.
Important Once a key is on the MOK list, it is automatically propagated to the platform
keyring on this and subsequent boots when UEFI Secure Boot is enabled.
7 Verify the key in the. platform keyring (Carbonblack: CB Kernel module signing key):
# keyctl list %:.platform
The 6 keys in keyring:
303429724: ---lswrv 0 0 asymmetric: VMware, Inc.:
4ad8ba0472073d28127706ddc6ccb9050441bbc7
170154433: ---lswrv 0 0 asymmetric: Carbonblack: CB Kernel module signing key:
6d6e00113731b310ef08654d1e91741c144a9fc4
750692654: ---lswrv 0 0 asymmetric: Red Hat Secure Boot CA 5:
cc6fa5e72868ba494e939bbd680b9144769a9f8f
117739269: ---lswrv 0 0 asymmetric: Microsoft Windows Production PCA 2011:
a92902398e16c49778cd90f99e4f9ae17c55af53
515584087: ---lswrv 0 0 asymmetric: Microsoft Corporation UEFI CA 2011:
13adbf4309bd82709c8cd54f316ed522988a1bd4
986080246: ---lswrv 0 0 asymmetric: VMware, Inc.: VMware Secure Boot Signing:
04597f3e1ffb240bba0ff0f05d5eb05f3e15f6d7
Carbon Black App Control Agent Installation Guide
VMware by Broadcom 48
Installing macOS Agents on
Endpoints
5
This section describes how to install macOS agents on endpoints.
Make sure your macOS system is compatible with the Carbon Black App Control agent; see
Carbon Black App Control macOS Agent Operating Environment Requirements.
See also the Release Notes at Carbon Black App Control Documentation for your version of
Carbon Black App Control for any special considerations.
Read the following topics next:
n Install macOS Agents on Endpoints
n Kext and System Extension Support
n Enable Full Disk Access (FDA) with MDM
Install macOS Agents on Endpoints
Perform the following procedure to install macOS agents on endpoints.
For macOS endpoints, you install the Carbon Black App Control agent by using the appropriate
installer DMG file. Installers for macOS are named as follows, varying by policy: policyname-
mac.dmg.
For systems running macOS Mojave 10.14.6 or later, and earlier than macOS BigSur 11x, you must
allow the agent kernel extension as described in Allow the Agent Kernel Extension During Agent
Installation or Upgrade or Kernel Extension Supporting macOS Versions.
Prerequisites
The following procedure assumes you have already:
n uploaded agent and rule packages as described in Uploading Agent Installers and Rules to
the Server.
n created one or more security policies for your agents as described in "Creating and
Configuring Policies" in the
Carbon Black App Control User Guide
.
n downloaded the appropriate installer as described in Downloading Agent Installers.
n For AD-based policy assignment, use an installer for any policy with automatic policy
assignment enabled.
VMware by Broadcom
49
n The same downloaded agent installer can be used on multiple endpoints, and can also be
distributed to endpoints via SSH or other distribution mechanisms like Casper.
n Verify installer integrity as described in macOS Agent Installer Integrity and Signature
Verification.
Procedure
1 Open a Finder window and change directory to the location where the installer was
downloaded (by default, the user-specific Download directory).
2 In Finder, double-click the agent installation file you downloaded: policyname-mac.dmg. A
standard package installation dialog begins.
3 Respond to the installation dialog prompts, and when the dialog indicates the installation was
successful, click Close. The agent begins operating immediately.
4 To verify the agent installation, run Activity Monitor and view All Processes. You should see
b9daemon running.
5 If you run anti-virus software, exclude the Carbon Black App Control agent installation
directory from anti-virus scanning. For enhanced security, Carbon Black App Control protects
its application directory. To avoid performance problems, specify in your anti-virus software
that the following directories are not scanned
n /Applications/Bit9/Daemon/b9daemon – the Carbon Black App Control agent process
n /Applications/Bit9 – the Carbon Black App Control program directory
n /Library/Application Support/com.bit9.agent – the Carbon Black App Control
data directory
n /Library/Extensions/b9kernel.kext – the Carbon Black App Control driver location
for macOS versions 10.9 (Mavericks) and later -or- /System/Library/Extensions/
b9kernel.kext, which is the Carbon Black App Control driver location for macOS
versions prior to 10.9
6 Add the following AV exclusion entries for Carbon Black App Control 8.7 and later agents for
the macOS supporting system extension:
n Bundle ID : com.vmware.carbonblack.appc-es-loader.appc-es-extension
n Path : /Applications/Bit9/Agent/appc-es-loader.app/Contents/MacOS/appc-es-loader
7 The macOS firewall can detect the agent as a new application and block access to the
network. Instruct users to permanently allow incoming connections to b9daemon.
8 Enable the macOS System Updates updater, which allows minor updates to the OS to be
approved for installation. Be sure you are running at least version 9 of this updater. You can
enable updaters on the Software Rules > Updaters page.
Carbon Black App Control Agent Installation Guide
VMware by Broadcom 50
What to do next
See "Endpoint Notifiers and Approval Requests" in the
Carbon Black App Control User Guide
for
a description of what the user sees on an endpoint that is protected by the agent.
Installing or Upgrading the macOS Agent on a Computer Running
Big Sur or Later Operating System
This section describes how to install or upgrade the macOS agent on a computer that is running
Big Sur or later operating system.
General Notes Regarding Installing or Upgrading a macOS Agent
n macOS Agents support Intel-based Mac hardware only. From Carbon Black App Control
macOS agent 8.7 onwards, Apple Silicon based hardware is supported.
n The macOS agent daemon b9daemon (display name) must have Full Disk Access (FDA)
enabled. See Enable Full Disk Access (FDA) with MDM
Important Information Regarding Big Sur and Later Platform Support
The following information is pertinent to agent endpoints that are running macOS 11.x Big Sur and
later platforms:
n M1 Support: System extension support is provided for M1 (Apple Silicon) and Intel Hardware
starting with macOS 11.0 BigSur & onwards.
n macOS 11.x (Big Sur) is not supported on any Carbon Black App Control macOS agent 8.5.0
and earlier.
n macOS 12.x (Monterey) is not supported on any Carbon Black App Control macOS agent prior
to 8.7.0.
n System Extensions are supported for macOS 11.0 BigSur and higher versions from Carbon
Black App Control agent 8.7.0.
n Kernel Extensions are supported for macOS 11.0 BigSur and earlier versions until Carbon Black
App Control agent 8.6.0.
n Full Disk Access: After installation or upgrade to Carbon Black App Control 8.7 (or later),
the user must give full disk access to system extension and other agent binaries to make
production function properly.
n Installation using BSX on Monterey Platform: In case of manual or MDM based installation
using BSX file on macOS 12 Monterey, use the command line sudo LC_ALL=C bash <bsx path>
if sudo bash <bsx path> is not working.
n After installing or upgrading a Carbon Black App Control macOS agent 8.5/8.6, manual
approval of KEXT is required on macOS 11.x Big Sur. After manual approval of KEXT, reboot
the endpoint.
n After installing or upgrading a Carbon Black App Control macOS agent 8.7 and onwards,
manual approval of SE is required on macOS 11.x Big Sur and later.
Carbon Black App Control Agent Installation Guide
VMware by Broadcom 51
n After installing or upgrading a Carbon Black App Control macOS agent 8.5/8.6 on an
endpoint running macOS 11.x Big Sur, a reboot of the endpoint is required. See Enterprise
management of legacy system extensions in macOS Big Sur (https://support.apple.com/en-
in/HT211860).
Note Reboot is not required for Carbon Black App Control macOS versions earlier than
macOS 11.x Big Sur.
n If you are using the console to upgrade or install Carbon Black App Control macOS agents
8.5/8.6 running macOS 11.x Big Sur, then your administrator must add post-installation MDM
policies to reboot the macOS 11.x Big Sur machines after installation or upgrade.
n Upgrade workflow for macOS agent 7.3.x and any macOS prior to 11.x Big Sur:
If... Then...
macOS Agent 7.3.x is installed and macOS is lower than
11.x (Big Sur)
Case 1: OS Upgrade to Big Sur: We recommend that you
upgrade the macOS agent to 8.5 or later first, and then
upgrade the macOS to 11.x (Big Sur).
Case 2: OS Upgrade to Monterey or later: We recommend
that you upgrade the macOS agent to 8.7.0 or later first,
and then upgrade the macOS to 12.x (Monterey) or later.
You upgrade the macOS to 11.x Big Sur or later before
upgrading the macOS agent to 8.x
The macOS agent will not work. In this scenario, you must:
1 Uninstall the 7.3.x macOS agent.
2 Reboot the endpoint.
3 Install macOS agent:
If the OS is upgraded to 11.x (Big Sur), install macOS
agent 8.5 or later.
If the OS is upgraded to 12.x [Monterey] or later, install
macOS agent 8.7 or later.
Manually Install the macOS Agent on Big Sur or Later
This topic describes how to manually install Carbon Black App Control macOS agent version 8.7
on macOS Big Sur (macOS 11) or later.
Procedure
1 Go to Rules -> Policies and select the download URL at the top of the page.
Alternatively, you can access a publicly accessible URL for this page using the following
format: https://<server_name>/hostpkg.
Carbon Black App Control Agent Installation Guide
VMware by Broadcom 52
2 On the Download Agent Install Packages page, click the macOS platform name and save the
file. When the download is complete, you can install the agent.
3 Open the Bit9Agent.dmg file that you downloaded.
4 Open the pkg file Install Bit9 Security Platform.pkg.
5 On the Introduction page, click Continue.
6 On the Installation Type page, click Install.
7 Provide user credentials and then click Install Software.
Carbon Black App Control Agent Installation Guide
VMware by Broadcom 53
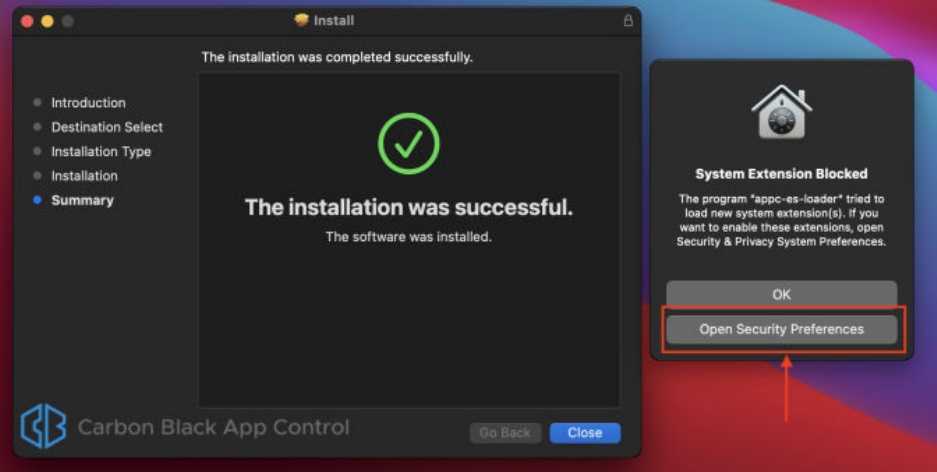
8 When the installation is complete, a prompt displays that "The installation was successful."
However, an additional notification states: System Extension Blocked. Click Open Security
Preferences.
Carbon Black App Control Agent Installation Guide
VMware by Broadcom 54
9 In the Security & Privacy pane of the System Preferences app, click the lock to authorize
changes and then click Allow to unblock appc_es_loader.
10 Some binaries from the package need Full Disk Access (FDA) to function correctly. To
provide that access:
a Open the System Preferences app and go to the Security & Privacy pane.
b On the Privacy tab, locate Full Disk Access in the list.
Carbon Black App Control Agent Installation Guide
VMware by Broadcom 55

c FDA is needed by appc_es_extension, b9notifier, and b9daemon. appc_es_extension will
display on the apps list; the other two apps must be added. Click the lock and then click
the + sign.
Clicking + opens Finder where the b9notifier and b9daemon binaries are located and
opened:
Carbon Black App Control Agent Installation Guide
VMware by Broadcom 56
Note Providing FDA access to b9notifier requires it to be restarted. When prompted,
click
Quit & Reopen.
d Repeat steps 10a. through 10c. for the binaries that require FDA.
Carbon Black App Control Agent Installation Guide
VMware by Broadcom 57

Deploying macOS App Control Agents Using Jamf Pro (Big Sur+)
You can use Jamf Pro to deploy the macOS App Control agent on macOS systems that are
running Big Sur or higher OS.
Important This Jamf Pro procedure is offered as guidance only. VMware does not provide
official support of Jamf software.
We recommend that you use the latest macOS App Control agent version for your deployment.
The configuration documented here was tested using the following versions:
n Jamf Pro 10.28
n Jamf Pro Composer 10.34.2
n Jamf Admin
n Mac AppC Agent 8.7.2.128
n macOS Big Sur 11.6
The basic deployment workflow is as follows:
1 Create a Configuration Profile in Jamf.
2 System Extensions Approval using Jamf.
3 Create a Package Using Jamf Composer and Upload macOS agent DMG to Jamf Pro.
4 Deploy Package using a Jamf Pro Software Distribution Policy that subsequently deploys a
package that you created in Jamf Pro to a temporary location. The policy executes the the
installer package.
Create a Configuration Profile in Jamf
This topic describes how to create configuration profiles for Carbon Black App Control macOS
agent version 8.7 or later on macOS Big Sur (macOS 11) or later. The method uses an MDM
configuration with Jamf to deploy the agent on multiple endpoints.
Procedure
1 In Jamf, create the Configuration Profile:
n Name: We recommend that you include the Extension (Kernel or System) method that is
being used.
n Description: Optional.
n Category: None
n Level: Computer Level
n Distribution Method: Install Automatically
Carbon Black App Control Agent Installation Guide
VMware by Broadcom 58
2 In the Privacy Preferences Policy Control section, enter the following App Access sub-
payloads:
To ensure full functionality of the macOS agent, enter each App Access sub-payload from the
following table. For all sub-payloads, the Identifier Type is Bundle ID, and the Application or
Service is SystemPolicyAllFiles with Access set to Allow.
Carbon Black App Control Agent Installation Guide
VMware by Broadcom 59

Identifier Identifier Type Code Requirement App or Service
com.vmware.carbon
black.appc-es-
loader.appc-es-
extension
Bundle ID identifier
"com.vmware.carbonblack.appc-es-
loader.appc-es-extension" and
anchor apple generic and
certificate
1[field.1.2.840.113635.100.6.2.6
] /* exists */ and certificate
leaf[field.1.2.840.113635.100.6.
1.13] /* exists */ and
certificate leaf[subject.OU] =
"7AGZNQ2S2T"
SystemPolicyAllFiles
Access: Allow
com.bit9.b9notifier Bundle ID identifier
"com.bit9.b9notifier" and
anchor apple generic and
certificate
1[field.1.2.840.113635.100.6.2.6
] /* exists */ and certificate
leaf[field.1.2.840.113635.100.6.
1.13] /* exists */ and
certificate leaf[subject.OU] =
"7AGZNQ2S2T"
SystemPolicyAllFiles
Access: Allow
/Applications/Bit9/
Daemon/b9daemon
Path identifier "com.bit9.b9daemon"
and anchor apple generic and
certificate
1[field.1.2.840.113635.100.6.2.6
] /* exists */ and certificate
leaf[field.1.2.840.113635.100.6.
1.13] /* exists */ and
certificate leaf[subject.OU] =
"7AGZNQ2S2T"
SystemPolicyAllFiles
Access: Allow
Ensure each of the App Access sub-payloads are entered from the preceding table. Without
the access specified, various parts of the Carbon Black App Control agent will not function
properly.
The Privacy Preferences Policy control sub-payloads should look like this:
Carbon Black App Control Agent Installation Guide
VMware by Broadcom 60
Carbon Black App Control Agent Installation Guide
VMware by Broadcom 61
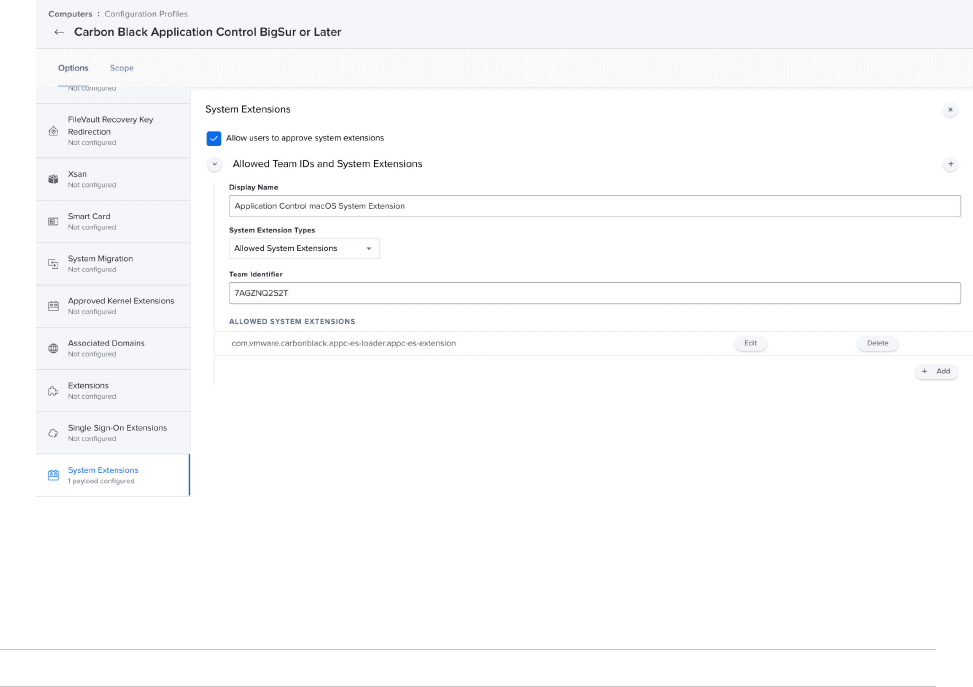
System Extensions Approval using Jamf
Carbon Black supports the System Extension for macOS BigSur and subsequent platforms. For
platforms prior to macOS BigSur, Carbon Black supports KEXT.
Note For a System Extenstions support matrix, see: Kext and System Extension Support.
Allow Users to approve system extensions (optional) – This setting depends on whether the
Jamf administrator wants to allow System Extensions from other products to be user-approved.
If this setting is enabled, users can approve additional system extensions that are not explicitly
allowed by this policy.
n As shown in following example, you can toggle Allow users to approve system extension to
control the users approval action for any System Extension of any product.
n You can add System Extensions on the Allowed Team ID and System Extensions tab. These
System Extensions do not require user approval. In the following example, we explicitly
added the Carbon Black App Control System Extension payload, which does not require user
approval.
The following parameters are used in the example shown here:
n n Display Name: Application Control macOS System Extensions
n System Extension Types: Allowed System Extensions
n Team Identifier: 7AGZNQ2S2T
n Allowed System Extensions: com.vmware.carbonblack.appc-es-loader.appc-es-extension
Example:
Carbon Black App Control Agent Installation Guide
VMware by Broadcom 62
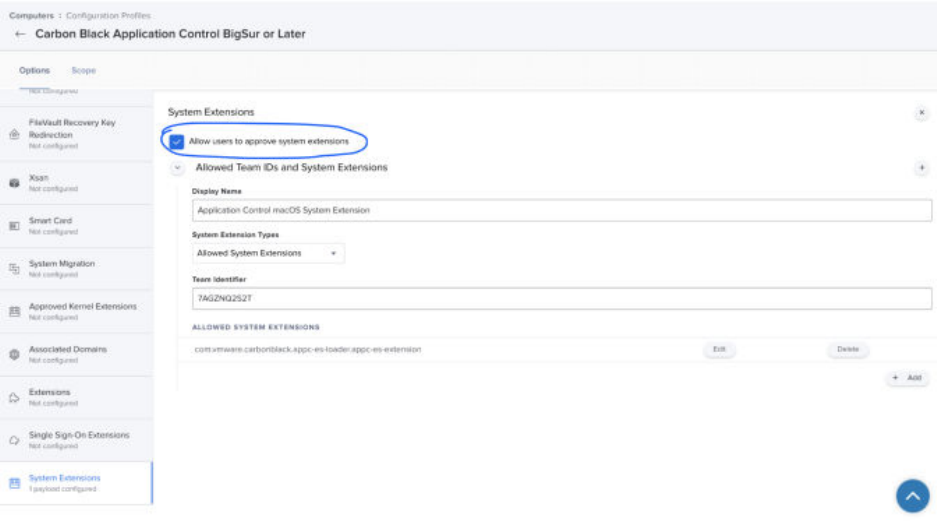
Create a Package Using Jamf Composer
Use this procedure to prepare the App Control macOS agent for deployment using Jamf Pro.
Prerequisites
This procedure assumes you have downloaded the agent and mounted the DMG file. If not, do
the following:
1 Obtain the macOS agent by following the instructions in Download an Agent Installer.
2 Mount the DMG file that you downloaded.
3 Open the mounted folder (for example, Bit9 Agent) using Finder, and press
Command+Shift+. to see the hidden config.xml and server.conf files in the mount point.
You will refer to these files in the procedure that follows.
Procedure
1 Create the folder: /private/tmp/appc.
2 Copy the following files from the mounted folder (for example, Bit9 Agent) to /
private/tmp/appc folder.
n config.xml
n server.conf
n Install Bit9 Security Platform.pkg
3 Open Jamf Composer, navigate to Preferences > Exclusion List, remove /private/tmp from
the list, and save the settings.
Carbon Black App Control Agent Installation Guide
VMware by Broadcom 63
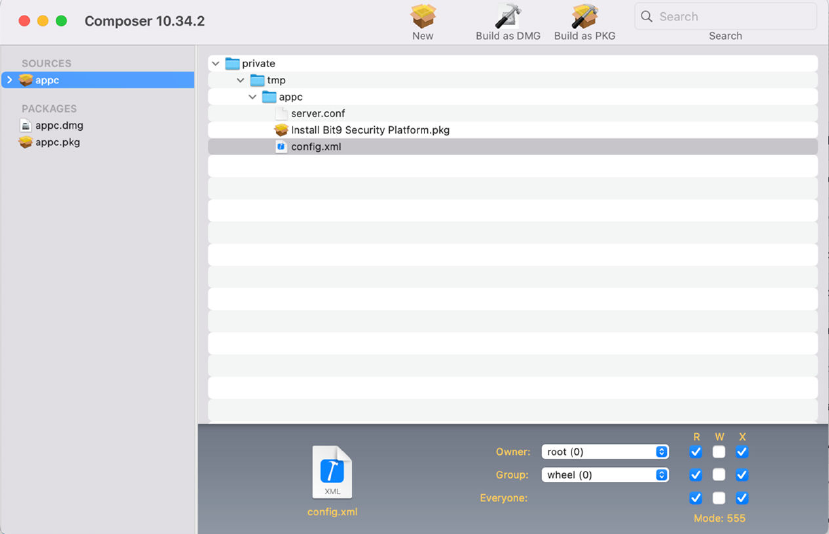
4 Copy the appc folder to the SOURCES folder on the left in Composer.
Verify all the folders and files were copied.
5 With the appc folder selected under SOURCES on the left in Composer, click Build as DMG,
and save locally, for example in the Desktop location.
When the package is built, appc.dmg is listed under PACKAGES on the left in Composer.
6 To verify the appc.dmg package details, such as the creation date, in the Desktop location in
Finder, click appc.dmg.
Results
What to do next
Use Jamf Admin to upload the macOS agent DMG and installation script to Jamf Pro.
Upload macOS agent DMG to Jamf Pro
Follow this procedure to use Jamf Admin to upload the macOS agent DMG and installation script
to Jamf Pro.
Prerequisites
This procedure requires a DMG package created in Jamf Composer. If you have not created one,
see: Create a Package Using Jamf Composer
Procedure
1 Start Jamf Admin.
Carbon Black App Control Agent Installation Guide
VMware by Broadcom 64
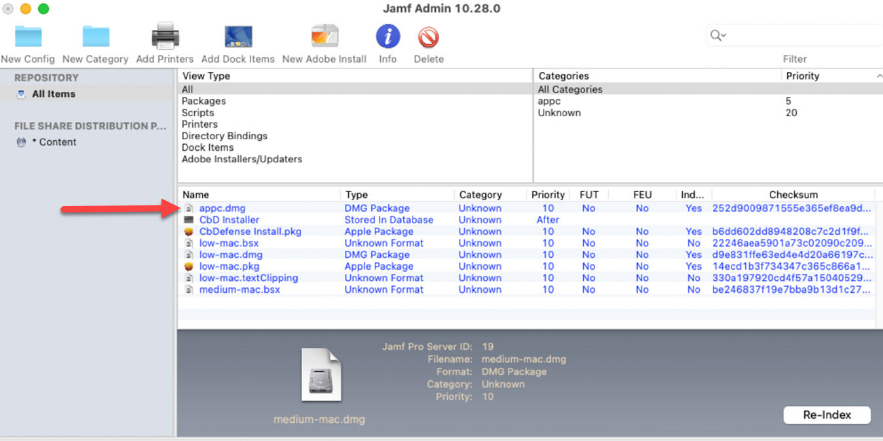
2 Add the DMG package to the repository.
In this example, appc.dmg is the package name used.
What to do next
You must create a software distribution policy in Jamf Pro and assign it to the DMG package.
See: Deploy Package using a Jamf Pro Software Distribution Policy
Deploy Package using a Jamf Pro Software Distribution Policy
Use this procedure to create a software distribution policy in Jamf Pro and deploy the DMG
package.
Prerequisites
This procedure requires that you previously Create a Package Using Jamf Composer and Upload
macOS agent DMG to Jamf Pro.
Procedure
1 Login to the Jamf Pro portal.
2 On the left panel, go to Computers > Policy.
Carbon Black App Control Agent Installation Guide
VMware by Broadcom 65
3 Click New to create a new software distribution policy and specify the following:
a On the General tab, specify:
1 In Display Name, enter a policy name.
2 From the Category drop-down list, select the respective category or leave it as
Unknown.
3 Select Recurring Check-in.
b On the Packages Options tab, specify:
1 On the right panel, click Configure.
2 Next to the DMG Package (appc.dmg in this example), click Add.
3 For Distribution Point, select Each computer's default distribution point.
4 For Action, specify Install.
5 Select Fill user templates (FUT).
6 Select Fill existing user home directories (FEU).
Carbon Black App Control Agent Installation Guide
VMware by Broadcom 66

c On the File and Process tab, specify:
1 In the Execute Command field, enter:
sudo installer -pkg /private/tmp/appc/Install\ Bit9\ Security\ Platform.pkg
-target /Applications/
4 Click Save.
After you save the policy, the deployment begins.
5 To verify successful deployment of package, check the logs of software distribution policy.
Create and Assign Smart Computer Groups
Create and assign two smart computer groups for the macOS agent deployment.
Carbon Black App Control Agent Installation Guide
VMware by Broadcom 67

You must set the scope of two smart computer groups to the configuration profile and software
policy. This scope ensures that the configuration profile is deployed to the endpoint before you
install the Carbon Black App Control macOS agent. If you deploy the Carbon Black App Control
agent without having deployed the configuration profile, the user receives approval prompts. If
the prompts are not approved, the agent is not fully functional.
Note Before you can select the Carbon Black App Control Settings Configuration Profile in
the second smart group (steps 5 through 10), you must first deploy the configuration profile to
a macOS endpoint and update the endpoint inventory. After Jamf Pro recognizes the installed
configuration profile, the profile becomes a selectable option when you are creating the smart
computer group.
Procedure
1 On the Jamf Pro dashboard, on the Computers tab, click Smart Computer Groups and then
click + New.
2 On the Computer Group tab, enter a name such as “macOS Big Sur Computers”.
3 Click the Criteria tab and set the following criteria:
n Criteria: Operating System
n Operator: like
n Value: 11
4 Save the smart computer group.
5 On the Jamf Pro dashboard, on the Computer tab, click Smart Computer Groups and then
click + New.
6 On the Computer Group tab, enter a name such as “Carbon Black App Control Settings”.
7 Click the Criteria tab and set the following criteria:
n Criteria: Profile Name
n Operator: Has
n Value: Click the … menu and select the Carbon Black App Control Settings – System
Extension Configuration Profile.
8 Save the smart computer group.
9 For the configuration profile, assign the “macOS Big Sur computers” smart computer group
to the scope.
Carbon Black App Control Agent Installation Guide
VMware by Broadcom 68

10 For the policy, assign the “Carbon Black App Control Settings” smart computer group to the
scope.
After the smart computer groups are assigned, deployment begins.
Important If deploying the Kernel Extension, you must approve it after it is installed
in System Preferences>Security & Privacy. This is an Apple-imposed requirement. This
approval is not required if deploying the System Extension. We recommend that you ask
the user to approve this extension by using a notification in the deployment policy.
Kext and System Extension Support
Kext and System Extension support depends on the version of the agent and the macOS. Use
the following tables to determine what is supported and what needs to be done in regards to
agent installation.
X = Supported
Table 5-1. macOS Agent 8.7.x +
Mojave (10.14.x)
Catalina
(10.15.x) Big Sur (11.x) Monterey (12.x)
Allowing the
Agent Kernel
Extension
(Mojave or
Later)
X X
System
Extensions
Approval using
Jamf
X X
Table 5-2. macOS Agents 8.5, 8.6
Mojave (10.14.x)
Catalina
(10.15.x) Big Sur (11.x)
Allowing the
Agent Kernel
Extension
(Mojave or
Later)
X X X
System
Extensions
Approval using
Jamf
Carbon Black App Control Agent Installation Guide
VMware by Broadcom 69

Allowing the Agent Kernel Extension (Mojave or Later)
For Carbon Black App Control agent 8.7, kernel extension is supported on macOS 10.14.x Mojave
and macOS 10.15.x Catalina. For Carbon Black App Control agent 8.5 and 8.6, kernel extension
was supported on MacOS 10.14.x Mojave, macOS 10.15.x Catalina and macOS 11.x BigSur.
The macOS version 10.13 (High Sierra) introduced changes in the way kernel extensions are
handled.
If you are installing or upgrading the Carbon Black App Control agent on any version of macOS
10.14 (or later), additional steps are needed to approve the Carbon Black, Inc. system extension,
which is required for proper operation of the agent.
This is true for manual agent installations and upgrades as well as those initiated from the Carbon
Black App Control console
Note This requirement does not apply if you are using a version of macOS prior to 10.13, and if
you are using Carbon Black App Control agent 8.7+ on macOS 11.x or later.For a KEXT support
matrix, see: Kext and System Extension Support
Allow the Agent Kernel Extension During Agent Installation or Upgrade or
Kernel Extension Supporting macOS Versions
Perform the following procedure to allow the agent kernel extension during agent installation or
upgrade (for Mojave or later macOS versions).
Procedure
1 Run the Carbon Black App Control agent installer.
For non-MDM installations on Mojave (or later), while you are running the Carbon Black App
Control agent installer, macOS will report that a system extension signed by Carbon Black,
Inc. was blocked. This will happen even if the extension is already approved on the system.
2 When this message appears, go to System Preferences > Security & Privacy on the macOS
system and click the Allow button for "Carbon Black, Inc.".
(This was ‘Bit9, Inc.’ for agents prior to 7.2.3 Patch 12.)
Important It is possible that you delay or are unable to allow the kernel extension
immediately after agent installation or upgrade. For example, you might automatically
upgrade unattended endpoints.
If you do not allow the kernel extension, agent installation continues, and the upgraded agent
will connect to the server, but it will not enforce rules until you allow the extension to load. On
the Carbon Black App Control console, this agent will show a status of Unprotected, Reboot
Required. In this case, complete the steps in Allow the Agent Kernel Extension After Agent
Installation or Upgrade on Kernel Extension Supporting macOS Versions.
Carbon Black App Control Agent Installation Guide
VMware by Broadcom 70

Allow the Agent Kernel Extension After Agent Installation or Upgrade on Kernel
Extension Supporting macOS Versions
Perform the following procedure to allow the agent kernel extension after agent installation or
upgrade (for Mojave or later macOS versions).
Procedure
1 Go to System Preferences > Security & Privacy on the endpoint and click the Allow button
for "Carbon Black, Inc.".
2 Restart the agent by rebooting the endpoint or by manually stopping and restarting the
agent using the following steps in a terminal:
cd /opt/bit9/bin
./b9cli -password <password>
./b9cli -tamperprotect 0
./b9cli -shutdown
sudo ./b9cli -startup
Note You must run the startup step as root or using sudo.
Enable Full Disk Access (FDA) with MDM
The following procedure outlines the steps required to enable Full Disk Access (FDA) control for
the Carbon Black App Control macOS agent using an MDM.
This procedure requires you to create a Configuration Profile with a Privacy Preferences Policy
Control (PPPC) payload in your MDM (for example, Workspace One UEM, Jamf®, or any other
MDM). This allows you to pre-approve application privacy permissions in your environment.
Note The following instructions use Jamf. Modify the instructions as needed to adjust for other
MDM solutions.
Procedure
1 In Jamf, go to Computers > Configuration Profiles.
2 Create a new profile and define it as follows:
a For Name, give the profile a name that helps explain what application it is giving rights to.
In this example, we use the name of the product followed by “PPPC”.
b For Category, select Applications.
c For Distribution Method, select Install Automatically.
d For Level, select Computer Level.
Carbon Black App Control Agent Installation Guide
VMware by Broadcom 71

e Navigate from the General tab to the Privacy Preferences Policy Control tab.
f For Identifier, enter cbProtection.
g For Identifier Type, select Bundle ID.
h For Code Requirement, enter the following code exactly as it is stated here:
Tip Copy/paste the following text to ensure accuracy.
identifier "com.bit9.b9notifier" and anchor apple generic and
certificate 1[field.1.2.840.113635.100.6.2.6] /* exists */ and certificate
leaf[field.1.2.840.113635.100.6.1.13] /* exists */ and certificate leaf[subject.OU] =
"7AGZNQ2S2T"
Note If you do not enter this code correctly, this procedure for enabling FDA will not
work properly.
i Under App or Service, select SystemPolicyAllFiles and under Access, select Allow.
j Save the policy.
3 Deploy and use this policy to enable FDA for all your macOS endpoints.
Carbon Black App Control Agent Installation Guide
VMware by Broadcom 72
Verify the Agent Installation
6
Perform the following procedure to verify that connected endpoints are running the Carbon
Black App Control agent and are visible to the Carbon Black App Control server.
Procedure
1 On the console menu, click Assets > Computers.
2 Examine the Computers page, which lists all endpoints running agent software, for the name
or IP address of each endpoint you want to confirm. You can use the Search field to find each
endpoint of interest.
3 Note the endpoint’s policy.
If the policy was assigned by Active Directory, the policy will have dashes at the beginning
and end of its name. Also note the Connected and Policy Status columns to determine
whether the machine is up-to-date.
Note During file initialization for a newly installed agent, the endpoint is already protected at
the Enforcement Level associated with its policy.
VMware by Broadcom
73
Post-installation Activities
7
After you have installed the Carbon Black App Control agent on endpoints and initialization is
complete, there are many ways to monitor and manage your endpoints.
n Viewing Endpoint Details – Carbon Black App Control server keeps details about each
endpoint running a Carbon Black App Control agent, including the endpoint’s IP address,
whether it is currently connected to the server, the policy, mode and Enforcement Level it is
assigned, computer model and system details, and its connection history. See "Viewing the
Table of Computers" in the
Carbon Black App Control User Guide
.
n Viewing Endpoint-related Events – You can monitor events related to a specific endpoint.
See "Event Reports" in the
Carbon Black App Control User Guide
.
n Changing Policy – You can change the security policy assigned to an endpoint if necessary.
See "Moving Computers to Another Policy" and "Restoring Computers from the Default
Policy" in the
Carbon Black App Control User Guide
.
n Creating Clones – If you plan to use an endpoint as the template for cloning other endpoints,
see "Managing Virtual Machines" in the
Carbon Black App Control User Guide
.
n Locally Approving Files – You can temporarily put an endpoint into Local Approval mode
so that files with a global state of Unapproved on the Carbon Black App Control server can
be installed locally and locally approved on this endpoint. See "Moving a Computer to Local
Approval Mode" in the
Carbon Black App Control User Guide
.
n Viewing Details of Connected Devices – You can track and manage fixed and removable
storage devices on agent-managed endpoints that are running Windows or macOS. See
"Viewing Devices on Computers" in the
Carbon Black App Control User Guide
for more
details.
n Saving a Snapshot – After agent installation and initialization is complete, you can instruct
the Carbon Black App Control server to save a named snapshot of all files (by hash) on this
endpoint currently inventoried by your server. This provides a reference point for analyzing
changes in file inventory for that endpoint, other endpoints, or your whole network. See
"Creating and Modifying Snapshots" in the
Carbon Black App Control User Guide
for more
details.
VMware by Broadcom
74
n Deleting Computers – If an endpoint is going to be removed from your network or from
Carbon Black App Control control, you can uninstall the agent and remove the endpoint from
the table of computers on the server. This requires a specific series of actions detailed in
"Deleting Computers" in the
Carbon Black App Control User Guide
.
Carbon Black App Control Agent Installation Guide
VMware by Broadcom 75

Upgrading Agents on Endpoints
8
After new agents are available on the Carbon Black App Control server, there are several ways
to upgrade the agent on endpoints.
n Enable automatic agent upgrades on a per-policy basis, thereby allowing the server to
manage the upgrade process.
n From the Carbon Black App Control console, initiate agent upgrades on one or more specific
endpoints.
n Manually upgrade agents on the endpoint.
n Use your standard software distribution system to manage upgrades.
Note Beginning with Carbon Black App Control 8.1.4, agent installers and the rule file that
determines their behavior are no longer included as part of an Carbon Black App Control server
installation. You must upload the rule file and agent installer packages separately after you install
the server.
See Uploading Agent Installers and Rules to the Server for details on uploading agent rule files
and installer packages.
Important Carbon Black App Control supports installation of agents only on systems listed in the
following operating environment requirements guides:
n Carbon Black App Control Windows Agent (on Windows Desktop) Operating Environment
Requirements
n Carbon Black App Control Windows Agent (on Windows Server) Operating Environment
Requirements
n Carbon Black App Control Windows Agent (Embedded) Operating Environment
Requirements
n Carbon Black App Control Linux Agent Operating Environment Requirements
n Carbon Black App Control macOS Agent Operating Environment Requirements
Read the following topics next:
n Feature Limitations for Non-Upgraded Agents
n Upgrade Issue with Windows XP and Server 2003
VMware by Broadcom
76

n Enabling Automatic Agent Upgrades
n Upgrading Agents from the Console
n Automating macOS Agent Upgrades Using an MDM Tool
n Upgrading macOS App Control Agents Using Jamf Pro (Big Sur+)
n Manually Upgrading Agents
n Agent Upgrade Status
Feature Limitations for Non-Upgraded Agents
You can continue to run some older agents as long as they are supported versions that are fully
patched. However, it is best to upgrade your agents as soon as possible.
In addition to including new features, each agent release generally includes performance and
security enhancements.
The console displays a message when the presence of older agents affects the displayed data or
possible actions on a particular page.
Upgrade Issue with Windows XP and Server 2003
Windows XP and Server 2003 lack the necessary certificates (both root and intermediate) to
validate the timestamps in the signature that Carbon Black uses.
To upgrade these operating systems to Carbon Black App Control agent version 8.7.4 of the App
Control agent customers must perform one of the following tasks.
Note If the root certificate is not trusted (using Option 1 or 2), the following error will still occur:
CERT_TRUST_IS_UNTRUSTED_ROOT.
Option 1: Import the Missing Certificates Into the Computer
Certificate Store
You can download the necessary certificates from https://community.carbonblack.com/t5/
Documentation-Downloads/App-Control-Windows-Agent-Digicert-Timestamp/ta-p/112610.
Install the certificates on your machines directly using MMC with the Certificates snap-in, or use
GPO. The root certificate should be imported to the Trusted Root Certification Authorities store.
The intermediate certificate should go to the Intermediate Certification Authorities store. These
should be imported at the machine level as opposed to the user level.
Option 2: Explicitly Trust the Timestamping Publisher
Another option is to trust the timestamping certificate. This can be a bit challenging
because it requires querying the database for the correct id. Full instructions can be found
on this document: https://community.carbonblack.com/t5/App-Control-Discussions/Ineligible-for-
Approval-CERT-TRUST-IS-PARTIAL-CHAIN/m-p/68553/thread-id/6292.
Carbon Black App Control Agent Installation Guide
VMware by Broadcom 77

Option 3: Use the ignore_partial_chain_on_countersignatures
config prop
Agents can be configured to ignore the missing countersignatures. This allows approval by
publisher for files that have valid code signing chains, while ignoring errors on the counter signing
chain.
Details on how to configure this can be found here:
https://community.carbonblack.com/t5/Knowledge-Base/App-Control-How-can-I-ignore-partial-
cert-chain-errors/ta-p/73892
Enabling Automatic Agent Upgrades
When new agent installers are added to the Carbon Black App Control server, the flag that
triggers the automatic agent upgrade process is set to Disabled. Follow these steps to enable
automatic upgrade of agents on connected endpoints.
n For each policy that contains agents you do not want to upgrade now, make sure the Allow
upgrades checkbox in the Options section of the Add Policy or Edit Policy page is not
checked.
n For each policy that has agents you do want to upgrade, check the Allow upgrades box in
the Options section of the Add Policy or Edit Policy page. Avoid doing this for a large number
of agents simultaneously (see the following Important note).
n On the System Configuration/Advanced Options tab, check Automatic Agent Upgrades.
Important
n Before you re-enable system-wide agent upgrades, be sure you disable upgrades for policies
that you do not want upgraded immediately.
n Simultaneous upgrade of a large number of agents can impact system performance. Contact
VMware Carbon Black Support for best practices regarding bulk agent upgrades.
n When a Carbon Black App Control server is upgraded, ongoing enhancements to interesting
file identification make it necessary to rescan the fixed drives on all agent-managed
endpoints. These upgrades also require a new inventory of files in any trusted directories
to determine whether there are previously ignored files that are now considered interesting.
This process can cause considerable input/output activity, which can require between
minutes and many hours, depending upon the number of agents and the number of files.
For upgrades managed by the Carbon Black App Control server and those using third-party
distribution methods, VMware Carbon Black recommends a gradual upgrade of agents to
avoid an unacceptable impact on network and server performance.
Carbon Black App Control Agent Installation Guide
VMware by Broadcom 78
Upgrading Agents from the Console
From the console, you can enable automatic agent upgrades to happen as part of the Carbon
Black App Control server’s regular maintenance of endpoints, but you can also force the upgrade
of an agent through the Carbon Black App Control console.
This action has the same effect as running the upgrade from the installer file. Use of this feature
requires the following:
n Automatic Agent Upgrades must be Enabled on the Advanced Options tab of the System
Administration page. The Upgrade Computers action does not display on the menu unless
this is enabled.
n The agent(s) must be at least at version 7.0.0 — upgrades from older agents are not
supported.
Note Agents that are disconnected from their server at the time of a console-based upgrade
are upgraded the next time they are connected.
Upgrade Agents from the Console
Perform the following procedure to immediately upgrade agents from the console.
Procedure
1 In the console, click the configuration (gear) icon and then click System Configuration.
2 Click the Advanced Options tab.
3 On the Advanced Options tab, if the Automatic Agent Upgrades field is Disabled, click the
Edit button. and then click Enabled on the Automatic Agent Upgrades menu. Click Update.
4 On the console menu, click Assets > Computers.
5 Find the endpoint(s) you want to upgrade and check the checkboxes next to their names.
Check the Upgrade Status to make sure the endpoints are capable of upgrade and not
already up to date.
Carbon Black App Control Agent Installation Guide
VMware by Broadcom 79

6 In the Action menu, click Upgrade Computers.
7 In the confirmation dialog, click OK to initiate the upgrade. Watch the description of the
endpoint in the table to see when the change is completed.
Automating macOS Agent Upgrades Using an MDM Tool
In addition to using the console to install the macOS agent, you can automate the install of the
agent using Smart Groups.
Note
n This topic describes just one workflow that you can use to install the macOS agent.
n Jamf is used here to automate the process; however, other tools can also be used.
n These instructions apply to macOS agent upgrades only. If you are installing new agents
for the first time, see Chapter 1 Preparing for Agent Installation or Update and Chapter 5
Installing macOS Agents on Endpoints.
Use the following policy workflow to upgrade your macOS endpoints with a new version of the
Carbon Black App Control macOS agent.
To upgrade the macOS agent, you must use the Bit9MacInstall.bsx.pkg.
This upgrade method uses a set of three MDM polices. Although you can use a single policy to
accomplish this task, using multiple policies serves as an error check safeguard.
For the following MDM policies to work, you must be able to detect the version of Carbon Black
App Control and the status of Tamper Protect on scoped agent machines. You can do this by
using two extension attributes that run a b9cli –status and then grep the data needed.
n MDM Policy One: The first MDM policy disables Tamper Protect on the agent machines
that are to be upgraded. This policy uses the data you grepped from the b9cli –status
command to determine the state of the agent. If Tamper Protect is enabled, this policy
disables it. To disable Tamper Protect, you must use the global password for your agents.)
n MDM Policy Two: The second MDM policy upgrades the Carbon Black App Control macOS
gent on any endpoint that has Tamper Protect disabled. This policy uses the data grepped
from the b9cli –status command to determine this required information. This policy also
runs the Bit9MacInstall.bsx.pkg, which performs the agent upgrade. When this script is
completed, there is no need to restart the agent endpoint being upgraded.
Carbon Black App Control Agent Installation Guide
VMware by Broadcom 80

n MDM Policy Three: The third MDM policy restores Tamper Protection on upgraded agent
endpoints. This policy will be set to any computer that has Tamper Protect disabled. This
policy uses the information grepped from b9cli –status.
Upgrading macOS App Control Agents Using Jamf Pro (Big
Sur+)
You can use Jamf Pro to upgrade the deployed macOS App Control Agent on macOS systems
that are running Big Sur or higher OS.
Important This Jamf Pro procedure is offered as guidance only. Carbon Black does not provide
official support of Jamf software.
We recommend that you use the latest macOS App Control Agent version for your upgrade.
The basic upgrade workflow performed by the upgrade process is as follows:
1 Disable Tamper Protection.
2 Upgrade the macOS Agent.
3 Enable Tamper Protection.
Upgrade the macOS App Control Agent Using Jamf Pro (Big Sur+)
Use this procedure to upgrade your App Control macOS Agent by using Jamf Pro.
Prerequisites
This procedure assumes you have already deployed the App Control macOS Agent.
Procedure
1 Download the DMG file you require. To do this, complete these steps:
a In the console menu, click Rules > Policies. The Policies page displays, with a message
and link at the top for downloading Carbon Black App Control software.
b On the Policies page, click the download link at the top of the page.
c On the Download Carbon Black App Control Agent Install Packages page, click Install
Package for the relevant DMG file you require, such as APC-5nnnn-xxxxx-mac.dmg.
The DMG file is downloaded to the Desktop location.
d On the Desktop, open the DMG file, and click on the mounted PKG file. View all hidden
files and ensure server.conf, config.xml, and the PKG file are displayed.
Carbon Black App Control Agent Installation Guide
VMware by Broadcom 81

2 Prepare the agent upgrade folder. To do this, complete these steps:
a In Terminal, go to the /private/tmp folder, and create the agent_upgrade folder.
b Open the agent_upgrade folder, and copy into it the three files: server.conf,
config.xml, and the PKG file.
c Copy the upgrade.sh file from the Desktop into the agent_upgrade folder.
3 Verify the upgrade.sh file. On the Desktop, open the upgrade.sh file, and verify its
contents, such as in the following sample. Ensure that the correct password is shown; it is
required to disable and enable Tamper Protection.
sudo /Applications/Bit9/Tools/b9cli --password xxxxxx
sudo /Applications/Bit9/Tools/b9cli --tamperprotect 0
sudo /Applications/Bit9/Tools/b9cli installer -pkg /private/tmp/agent_upgrade/Install\
Bit9\ Security\ Platform.pkg -target /Applications/
sudo /Applications/Bit9/Tools/b9cli --password xxxxxx
sudo /Applications/Bit9/Tools/b9cli --tamperprotect 1
4 Give execution permission for the upgrade.sh file. To do this, complete these steps:
a In Terminal, go to the agent_upgrade folder.
b Enter the command chmod +x upgrade.sh.
5 Create a DMG file that is compatible with the Jamf server. To do this, complete these steps:
a Open Jamf Composer, copy the agent_upgrade folder from the tmp folder, and place it
under SOURCES on the left in Composer.
b To see the list of files, navigate to private>tmp>agent_upgrade. The following files are
shown: server.conf, config.xml, the PKG file, and the upgrade.sh file.
c With agent_upgrade selected under SOURCES, click Build as DMG, select the target
location, and click Save. A progress window shows the status of the DMG file that is being
built.
When the package is built, agent_upgrade.dmg is listed under PACKAGES on the left in
Composer.
d Click on the agent_upgrade.dmg package to view details, such as its location under
Desktop.
e To verify the agent_upgrade.dmg package details, in the Desktop location in Finder, click
agent_upgrade.dmg.
6 Upload the agent_upgrade.dmg file to the Jamf server. To do this, complete these steps:
a Log in to the Jamf server using the Jamf Admin user ID.
b Copy the agent_upgrade.dmg file from the Desktop location and paste it into the
Packages repository.
Carbon Black App Control Agent Installation Guide
VMware by Broadcom 82

7 Create a policy and perform the upgrade. To create a policy with the appropriate settings
and perform the upgrade, complete these steps:
a Log in to your Jamf browser.
b Under Computers, click Policies, and click New.
c Under Options, in the General section, specify a display name, such as Upgrade APPC
Agent. Click Enabled, select appc for Category, and check Recurring Check-in for
Trigger. Optionally, select Automatically re-run policy on failure, and specify the number
of retry attempts.
d Under Options, click Packages, and click the + (plus) button. In the list of available
packages on the Jamf server, click Add next to the agent_upgrade.dmg package you
already uploaded.
e Under Options, in the Packages section, with the agent_upgrade.dmg package added,
in the
Action dropdown, click Install. Ensure all three options are selected: Fill user
templates (FUT), Fill existing user home directories (FEU), and Update Autorun data.
f Under Options, click Files and Processes, and for the Execute Command field, specify the
full script file path and the execution command, for example, sudo sh /private/tmp/
agent_upgrade/upgrade.sh.
g Under Scope, ensure you add your list of devices which require the agent upgrade. These
are listed under Selected Deployment Targets.
h Ensure all your settings are correct before continuing to the next step to save the policy.
Important When you save your policy in the next step, the agent upgrade is performed.
i To save your policy, which will also perform the agent upgrade, click Save.
The agent upgrade is performed.
j Click Logs, and check the execution status in the Status column. For example, the status
may be Pending or Completed.
k When the status is Completed, click Details, and verify the list of steps performed to
ensure each step completed without any issue.
Results
The App Control macOS Agent is upgraded.
Manually Upgrading Agents
For disconnected systems or if you are using a software distribution system such as SCCM or
Altiris to distribute upgrades, you must distribute Carbon Black App Control agent installation
files to the endpoints or distribution server.
Carbon Black App Control Agent Installation Guide
VMware by Broadcom 83

Agent installation files are located on the Carbon Black App Control server:
n For 32-bit systems: Program Files\Bit9\Parity Server\hostpkg
n For 64-bit systems: Program Files (x86)\Bit9\Parity Server\hostpkg
Manually Upgrading Windows Agents
Use ParityHostAgent.msi for all manual Windows agent upgrades.
Note
n Manual upgrades must be run either by Local System or by a user account that has
administrative rights and a loadable user profile.
n Manual upgrades must use a full path to the installer in the MSIEXEC command.
When a Carbon Black App Control server manages upgrades to 8.8.2 agents, the agents receive
a new list of rules. For manual agent upgrades and upgrades using a third-party distribution
method, major upgrades require that the file containing the new rules, configlist.xml, be
copied to a location accessible to the agent installer. On the Carbon Black App Control server,
this file is located in the same hostpkg folder as the agent installer, but it does not have a link on
the Downloads page. It must be manually copied or referenced with a URL or path in the installer.
Manually Upgrade Windows Agents
Perform the following procedure to manually upgrade Carbon Black App Control Windows
agents.
The following procedure assumes that you use the default values for parameters that would be
used by an automatic upgrade run by using the server. Command Line Installations of Windows
Agents shows parameters that can allow non-default configurations of an installation using
MSIEXEC.
Procedure
1 Log in to the console from the endpoint on which you want to download the installer.
2 On the console menu, click Rules > Policies and then click the Download agent software link
at the top of the Policies page.
3 Download the agent upgrade installer file ParityHostAgent.msi to the location from which
you want to run or distribute the upgrade.
For example, to use a URL, you can click Rules > Policies in the console, click the Download
agent software link, and edit the URL for the download page as follows:
https://<your server name>/hostpkg/pkg.php?pkg=ParityHostAgent.msi
4 Click the Save option provided by your browser.
Carbon Black App Control Agent Installation Guide
VMware by Broadcom 84

5 (Optional) Follow the same procedure to download the new Carbon Black App Control rules
list (configlist.xml) to a location that is accessible to the agent installer, or make sure that
the agent installer system can access the hostpkg folder on the Carbon Black App Control
server.
To use a URL, enter the following text into a browser on the endpoint to which you want to
download the file:
https://<your server name>/hostpkg/pkg.php?pkg=configlist.xml
Note If you are using a command line argument to upgrade the agent, you do not
necessarily have to download configlist.xml. You can use the preceding URL as an
argument in the command line. See Step 7.
6 If you are manually upgrading a single endpoint, move the configlist.xml file to the
agent data folder. This is usually
C:\ProgramData\Bit9\Parity Agent. Run the installer;
for example, ParityHostAgent.msi.
7 If you are preparing to upgrade agents by using a third-party distribution system, you can
use that system to distribute the
configlist.xml file to the agent folder on all agents, or
you can use command line arguments in MSIEXEC to include the new rules file in the upgrade
installations. A command line for such an upgrade using ParityHostAgent.msi might look
like the following:
msiexec /i <path>\ParityHostAgent.msi B9_CONFIG=<path>\configlist.xml /L*v+
c:\ParityHostAgentUpgrade.log
You can use a URL, a UNC path, or a full local path in the command to specify the location of
configlist.xml. You cannot use a relative path or a file name without a path.
Important Certain agent releases may come with special instructions that supersede or
supplement the standard installation instructions. If in doubt about how to install an upgrade,
consult the User Exchange or contact Carbon Black Technical Support.
Manually Upgrade Linux Agents
Perform the following procedure to manually upgrade a Carbon Black App Control Linux agent.
Procedure
1 Log in to the Carbon Black App Control console as an administrator.
2 Go to the Assets > Computers page, and in the row for the endpoint you intend to manually
upgrade, click the computer name or click the View Details link.
3 On the Computer Details page, click Disable Tamper Protection, located on the far right
under the Advanced section. It can take a few minutes before Tamper Protection is disabled
on the agent.
Carbon Black App Control Agent Installation Guide
VMware by Broadcom 85

4 Download the upgrade installer for your Linux version to the endpoint on which you plan to
upgrade the agent (or a point from which you can copy it):
n Bit9Redhat8Install.bsx – for 8.x versions of RHEL, CentOS or Oracle RHCK
n Bit9Redhat7Install.bsx – for 7.x versions of RHEL, CentOS or Oracle RHCK
n
Bit9Redhat6Install.bsx – for 6.x versions of RHEL, CentOS or Oracle RHCK
You can use a URL, UNC path, or any other standard means of downloading the file. Note
that this installer is not listed on the Agent Downloads page in the console.
To use a URL, click Rules > Policies in the console, click the Download link at the top of the
page, and edit the URL for the download page as follows:
https://<serveraddress>/hostpkg/pkg.php?pkg=Bit9Redhat{6,7 or
8}Install.bsx
5 If necessary, copy the downloaded BSX file to the endpoint where you are upgrading the
agent.
6 Open a Terminal window and change directory to the location where the installer was
downloaded or copied. For example: cd ~/Downloads
7 Execute the following command with the appropriate version of the BSX file:
sudo bash Bit9Redhat{6,7,8}Install.bsx
Manually Upgrade macOS Agents
Perform the following procedure to manually upgrade a Carbon Black App Control macOS agent.
Procedure
1 Log in to the Carbon Black App Control console as an administrator.
2 Go to the Assets > Computers page, and click on the computer name or View Details link for
the computer you intend to manually upgrade.
3 On the Computer Details page, either:
Disable tamper protection by clicking Disable Tamper Protection, located on the far right
under the Advanced section. It can take a few minutes before Tamper Protection is disabled
on the agent.
-or-
Move the agent to a Disabled mode policy.
Carbon Black App Control Agent Installation Guide
VMware by Broadcom 86
4 Download the upgrade installer for macOS agents, which is Bit9MacInstall.bsx. You can
do this by using a URL, UNC path, or any other standard means of getting to the file. Note
that this installer is not listed on the Downloads page in the console.
To use a URL, you can click Rules > Policies in the console, click the Download link at the top
of the page, and edit the URL for the download page as follows:
https://<serveraddress>/hostpkg/pkg.php?pkg=Bit9MacInstall.bsx
5 Open a Terminal window and change directory to the location where the installer was
downloaded (by default, the user-specific Download directory). For example: cd ~/Downloads
6 Enter the following command to install the agent:
sudo bash Bit9MacInstall.bsx
7 f you are not using MDM and are currently on any version of Mojave or later operating
system, see Allowing the Agent Kernel Extension (Mojave or Later) for additional, mandatory
steps to allow the Carbon Black, Inc. kernel extension.
8 If you have not already done so, enable the macOS System Updates updater, which allows
minor updates to the OS to be approved for installation. Be sure you are running at least
version 9 or later of this updater. You can enable updaters on the Software Rules > Updaters
page.
Agent Upgrade Status
The Computers page in the Carbon Black App Control console provides an Upgrade Status
column visual distinction between computers running up-to-date agents and those running
previous versions.
Also on this page, the Connected column uses different color dots to indicate different agent
conditions. Hovering the mouse over the dot provides a text description of the condition. See
"Computer Details" in the
Carbon Black App Control User Guide
for more information about these
indicators.
In addition, the Upgrade Status column in the Computers table shows a more detailed
description of agent status as each agent goes through the upgrade process. Endpoints
transition to an Upgrade Status and Policy Status of Up to date when all their upgrade
processing has been completed.
Carbon Black App Control Agent Installation Guide
VMware by Broadcom 87

An upgraded agent begins running immediately. You usually do not need to reboot the agent
computer, but there are cases in which you may see an Upgrade Status is Reboot required:
n Some Windows XP/2003 systems must be rebooted after upgrade to assure proper ordering
of processes and enforcement of rules on systems using DFS.
n On any Windows version, if a file is in use by another process when the agent installer
attempts to write that file, you must reboot the endpoint to allow the system to replace the
old file with the current version.
The following table shows possible Upgrade Status values.
Table 8-1. Upgrade Status Messages
Upgrade Status Description
Not Requested Agent can be upgraded but upgrades are not enabled for
the policy, or they are turned off globally.
Upgrade waiting Agent can be upgraded and is in a policy that allows
upgrade. Waiting to be scheduled by server.
Upgrade scheduled Agent has been scheduled for upgrade, or computer has
downloaded the upgrade package and not run it yet.
Note that the server does not track when the agent
upgrade package is downloaded and run.
Upgrade requested An agent upgrade for this computer was requested from
the console.
Reboot required Agent is waiting for a reboot after upgrade. Reboot is
required only under certain conditions.
Not supported Agent cannot be upgraded because the computer is
running Windows 2000 or another operating system that
is not supported for the current agent.
Upgrade blocked Agent configuration list is not up-to-date and is missing
one or more values required for a successful upgrade.
One example of this is use of an out-of-date port number
for communication with the Carbon Black App Control
server. Agent cannot upgrade through the server until
the configuration is up-to-date, but can be upgraded
through other means. In most cases, a connected agent
will eventually reach the required configuration list version
without intervention. Prioritizing the agent for updates
(on the Computer Details page Action menu) expedites
configuration list updates. If an agent still remains in
"Upgrade blocked" for an extended period, contact
Carbon Black Support.
Up to date Agent upgrade (or new installation) has been completed.
Agent uninstalled Agent was on this endpoint but has been uninstalled.
Carbon Black App Control Agent Installation Guide
VMware by Broadcom 88
Uninstalling Agents on Endpoints
9
Standard un-installation procedures delete all Carbon Black App Control files, including the
notifier program and drivers. Users are not permitted to uninstall an enabled agent unless
they have special agent administrative access as described in "Configuring Agent Management
Privileges" in the
Carbon Black App Control User Guide
.
To uninstall, you must disable the agent by placing the endpoint in a policy that is in Disabled
mode, which can be done on the Computers page. If you have not already done so, log in to
the Carbon Black App Control console and create a policy with its Mode set to Disabled before
attempting to uninstall any agents. You might name this “Agent Disabled” or “Ready to Uninstall”.
When you create the policy, the server automatically creates an agent installer for it and adds
the installer to the Download Install Packages page.
Read the following topics next:
n Uninstall the Windows Agent from an Endpoint
n Uninstall the Linux Agent from an Endpoint
n Uninstall the macOS Agent from an Endpoint
Uninstall the Windows Agent from an Endpoint
Perform the following procedure to uninstall the Carbon Black App Control Windows agent from
an endpoint.
Procedure
1 In the Carbon Black App Control console, find the endpoint on the Computers page and move
it into the agent disabled policy.
2 On the endpoint, shut down all other applications.
VMware by Broadcom
89

3 On the client computer, run the standard program removal procedure from the Windows
Control Panel:
a On the Windows Control Panel, select Add or Remove Programs, or for Vista or Windows
7 systems, select Programs and Features.
b From the list of programs, select App Control Agent.
c Click the Remove button or Uninstall button (depending upon your operating system)
and wait for the uninstall to complete.
4 In the Carbon Black App Control console, delete the endpoint from the Computers page.
This step tells the Carbon Black App Control server that the endpoint is no longer in service
(rather than temporarily disconnected from the network), and removes its name from the
table of active computers (endpoints).
Uninstall the Linux Agent from an Endpoint
Perform the following procedure to uninstall the Carbon Black App Control Linux agent from an
endpoint.
Procedure
1 In the Carbon Black App Control console, find the endpoint on the Computers page and move
it into the agent disabled policy.
2 On the endpoint, login with administrator privileges or an account that can run sudo.
3 In a shell window, change to the agent application directory:
cd /opt/bit9/bin
4 Run the uninstall script:
n To remove the agent and all of its data, run the following command:
sudo sh ./b9uninstall.sh
n To remove the agent but preserve agent data in /srv/bit9, run the following command:
sudo sh ./b9uninstall.sh -d
5 In the Carbon Black App Control console, delete the endpoint from the Computers page.
This step tells the Carbon Black App Control server that the endpoint is no longer in service
(rather than temporarily disconnected from the network), and removes its name from the
table of active computers (endpoints).
Carbon Black App Control Agent Installation Guide
VMware by Broadcom 90

Uninstall the macOS Agent from an Endpoint
Perform the following procedure to uninstall the Carbon Black App Control macOS agent from an
endpoint.
Procedure
1 In the Carbon Black App Control console, find the endpoint on the Computers page and move
it into the agent disabled policy.
2 In a Terminal or another shell interface, run the following command:
sudo /Applications/Bit9/uninstall.sh
3 In the Carbon Black App Control console, delete the endpoint from the Computers page.
This step tells the Carbon Black App Control server that the endpoint is no longer in service
(rather than temporarily disconnected from the network), and removes its name from the
table of active computers (endpoints).
What to do next
After uninstalling a macOS agent, Carbon Black recommends rebooting the endpoint.
Carbon Black App Control Agent Installation Guide
VMware by Broadcom 91

Document History
10
The following changes were made to this document:
Date
Associated Software
Version Topic Change Description
18 July 2024 N/A Install Linux Agents on
Endpoints
Updated url on step 3.
8 May 2024 N/A Enable Secure Boot for
Linux Agents
Added new Linux topic
8 April 2024 N/A Command Line Installations
of Windows Agents
Updated description for
B9_SERVER_IP.
7 March 2024 N/A Fixed broken link.
25 August 2023 N/A Upgrading macOS App
Control Agents Using Jamf
Pro (Big Sur+)
Added new topics about
upgrading the macOS App
Control Agent by using
Jamf Pro.
27 July 2023 N/A Preface Added note.
26 June 2023 N/A Install Linux Agents on
Endpoints
Updated steps 4 and 5.
24 May 2023 N/A Create a Configuration
Profile in Jamf
Removed tabs from the
entries in the Code
Requirement table column.
24 April 2023 N/A Install Windows Agents on
Endpoints
Added note in
Prerequisites about
process hollowing
prevention.
23 February 2023 N/A Create a Package Using
Jamf Composer
Updated steps in
Prerequisites and
Procedure.
24 January 2023 N/A Install Linux Agents on
Endpoints
Updated step 3.
30 November 2022 N/A Install Linux Agents on
Endpoints
Updated Prerequisites for
Linux 9.0.
15 November 2022 N/A Install Linux Agents on
Endpoints
Updated Prerequisites for
Linux 9.0. Added step 3.
VMware by Broadcom 92

Date
Associated Software
Version Topic Change Description
2 August 2022 N/A Manually Upgrade
Windows Agents
Updated script on step 7.
29 June 2022 N/A Create and Assign Smart
Computer Groups
Added new Jamf topic
28 June 2022 N/A Deploying macOS App
Control Agents Using Jamf
Pro (Big Sur+)
Updated section regarding
installing macOS Agents
using Jamf
30 April 2022 N/A All Version 1 of this document
Carbon Black App Control Agent Installation Guide
VMware by Broadcom 93
